Rule Workflow
Use the action bar to navigate to the Workflow card. As displayed below, an new rule presents a mostly empty decision tree, with the Starting anchor and an invitation to Add a new logic step.
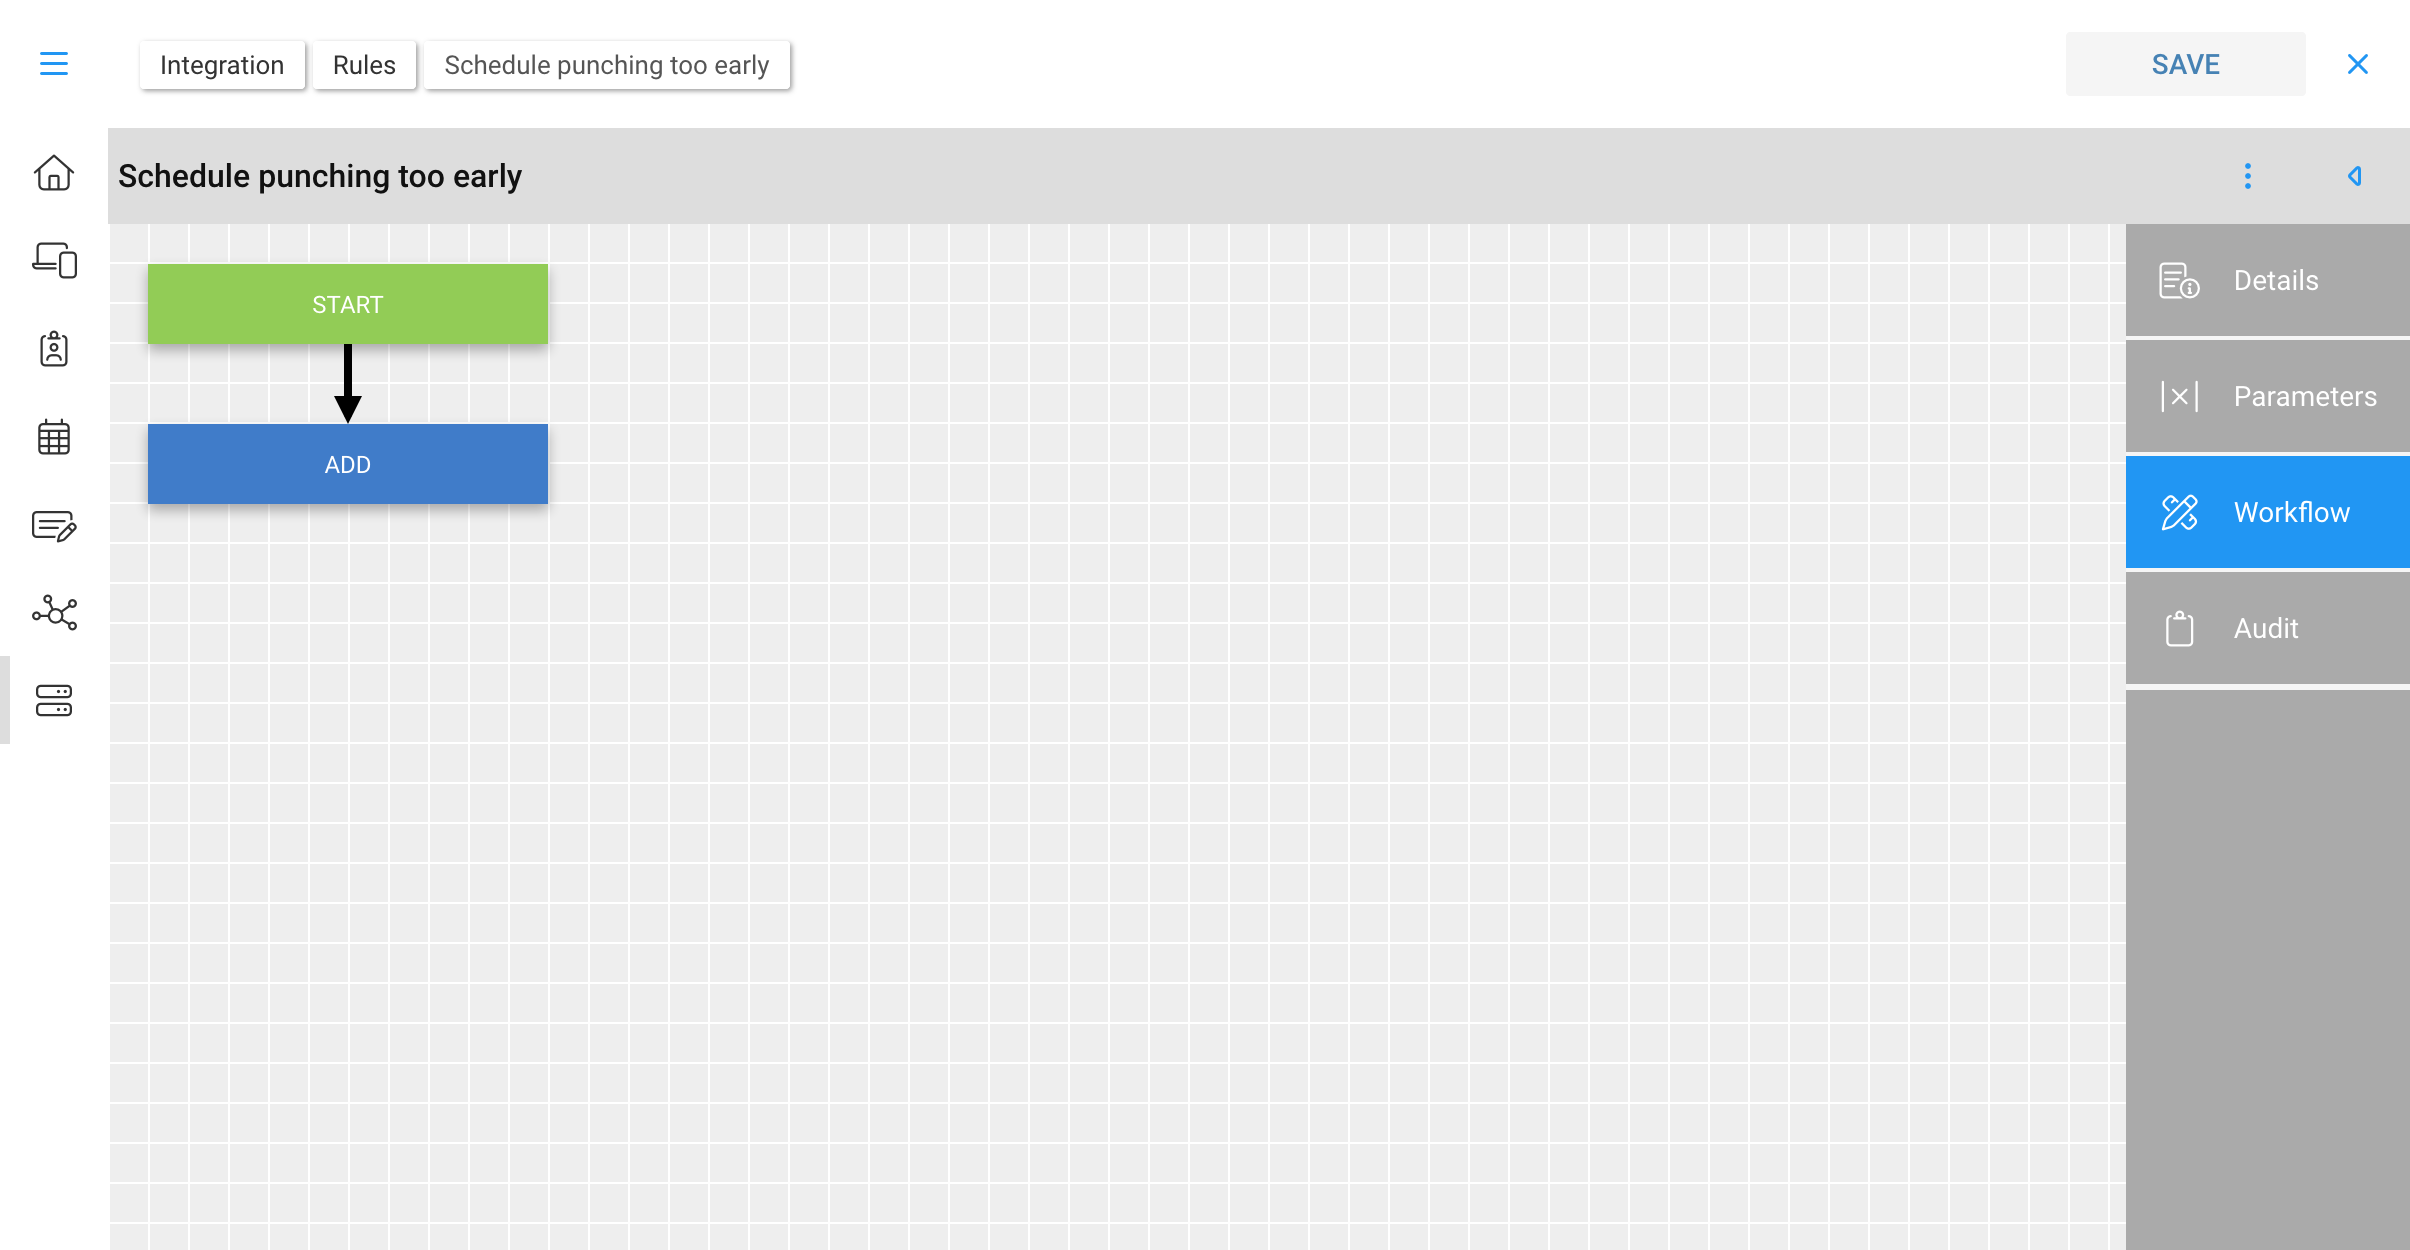
The decision tree consists of a series of logical steps where you decide whether to continue, bail out, update, perform calculations, store values and so on. The list of operations which can be performed are as follows:
Workflow Operations
Operation | Description
:-- |: --
Start | The start of a list of rule segments (placeholder, doesn't do anything)
ADD | A placeholder from which the next step in the decision tree is created (this is where you start)
IF | A logical test of the form:
IF condition THEN do this
SET | An assignment action of the form:
SET target = source
DO | A form of SET where there is no target. In this case source is a function which is taking an action, but the target is ambiguous or more than a singular entity
DONE | The end of a set of rule segments, or an early exit from the rule set
Workflow Guidelines
There is no one correct way to write a rule's workflow, so long as it generates the desired output. However, there are some general guidelines which we feel make writing and maintaining rules easier:
-
Think linear break problems down into small steps which follow one after the other. You might start by laying out the rule on paper or in a spreadsheet in order to gather core thoughts and steps
-
Fail early and often We like testing all the conditions which would end or disqualify a rule from being processed to the end of the statement list
-
Conversely, don't fail filters we have filters in Pay Groups which can handle demographic exclusions
-
Use temporary variables as you'll see in the next section, rule expressions are nest-able and can get complicated if too much happens in one step; variables let you break things down into smaller more easily understood steps
-
Use Comments so your thought process is easier to follow
-
The final target is often a SET which performs the final action of the rule; everything up to that point is qualification (do you continue) or preparation (calculations and temporary variables)
A hypothetical decision process using the workflow would appear as follows:
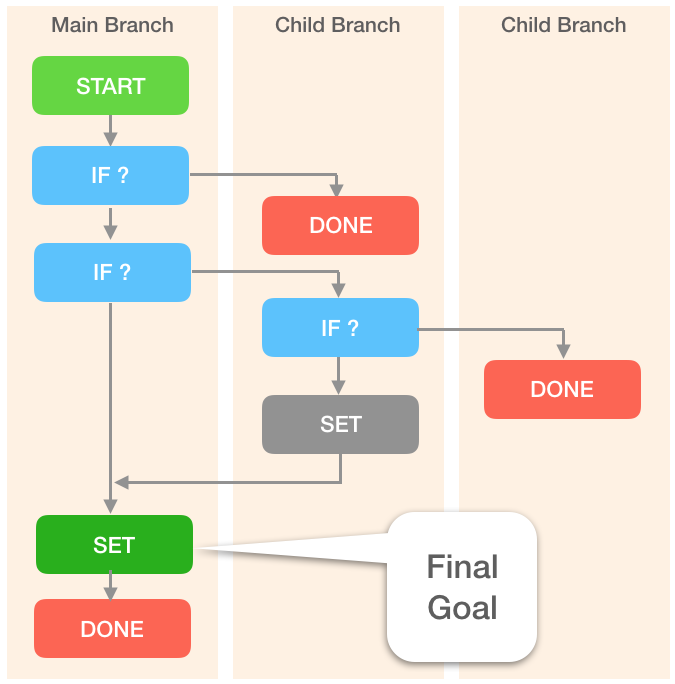
In the above, the red "DONE" buttons are the early exits where a condition is not met, so the rule terminates. The final green "SET" is the desired target where the rule is applied.
The next section is going to cover the rules editor and how you actually write a rule statement. So for now we'll gloss over those details as we look at how an overall rule workflow is built.
Example Rule
Lets see how an example rule would flow from start to finish. We'll use a simple example of looking a timesheet IN punch to determine if the worker arrived too early for work. In the previous sections we showed a new rule being created and the parameter Minutes_Early exposed as an Integer.
The intent is that during the configuring of the rule with a Pay Group, the user will specify a number of minutes before the shift start (say 15) before which punching is considered too early.
As to what we do with the outcome of this rule, one would look towards Workflows
Lets walk through the decision steps for this rule.
| Step | Action | Comments |
|---|---|---|
| Check Punch Action | If not an IN, get out | We can use the punch's Description to test the action |
| Check if we are scheduled to work that day | If scheduled hours are zero, get out | Can't be early if we don't have a schedule; the CALC function will be used to lookup scheduled hours |
| Calculate the number of minutes early | minearly = difference_between_punchtime_and_scheduletime | Can use the TIME_DIFF_MINUTES and SCHEDULE functions to get this info |
Test if the calculated minearly is within the allowed threshold | If minearly less than the rule parameter Minutes_Early, get out | The rule parameter is provided by the user when the rule is attached to the Pay Group, so we don't really know its value |
| If we get this far, then we have an early exception | Assign arrived early exception to the punch | We can use the SET_EXCEPTION function to assign a value from the Exceptions table |
In the second-to-last line above, rather than testing for minearly being less than Minutes_Early and falling out, we could have switched the operation around and tested for minearly being greater than the rule parameter and branching off to set the exception.
Both approaches are correct, however, then we end-up deviating from having the final step of the rule being where we assign a result. The benefit is that we always know where to go to find the result, versus hunting through the rule and having to inspect each statement.
There may be times when deviating makes sense, as in a case where multiple SET actions need to be performed which are mutually exclusive. So no right or wrong, just guidelines to keep things manageable.
The actual rule and its decision tree statements for the above can be seen here: Attendance, early arrival
Adding An Operation
Now lets look at adding a new step to our rule's decision tree. Clicking the ADD button on the workflow diagram pops up a menu of operator types (IF, SET, DO..). In this case we'd choose IF.
The IF statement in this case will test for an IN punch by looking at its Description. We'll dive into the rules editor in the next section, so for now here is how that rule statement is presented:
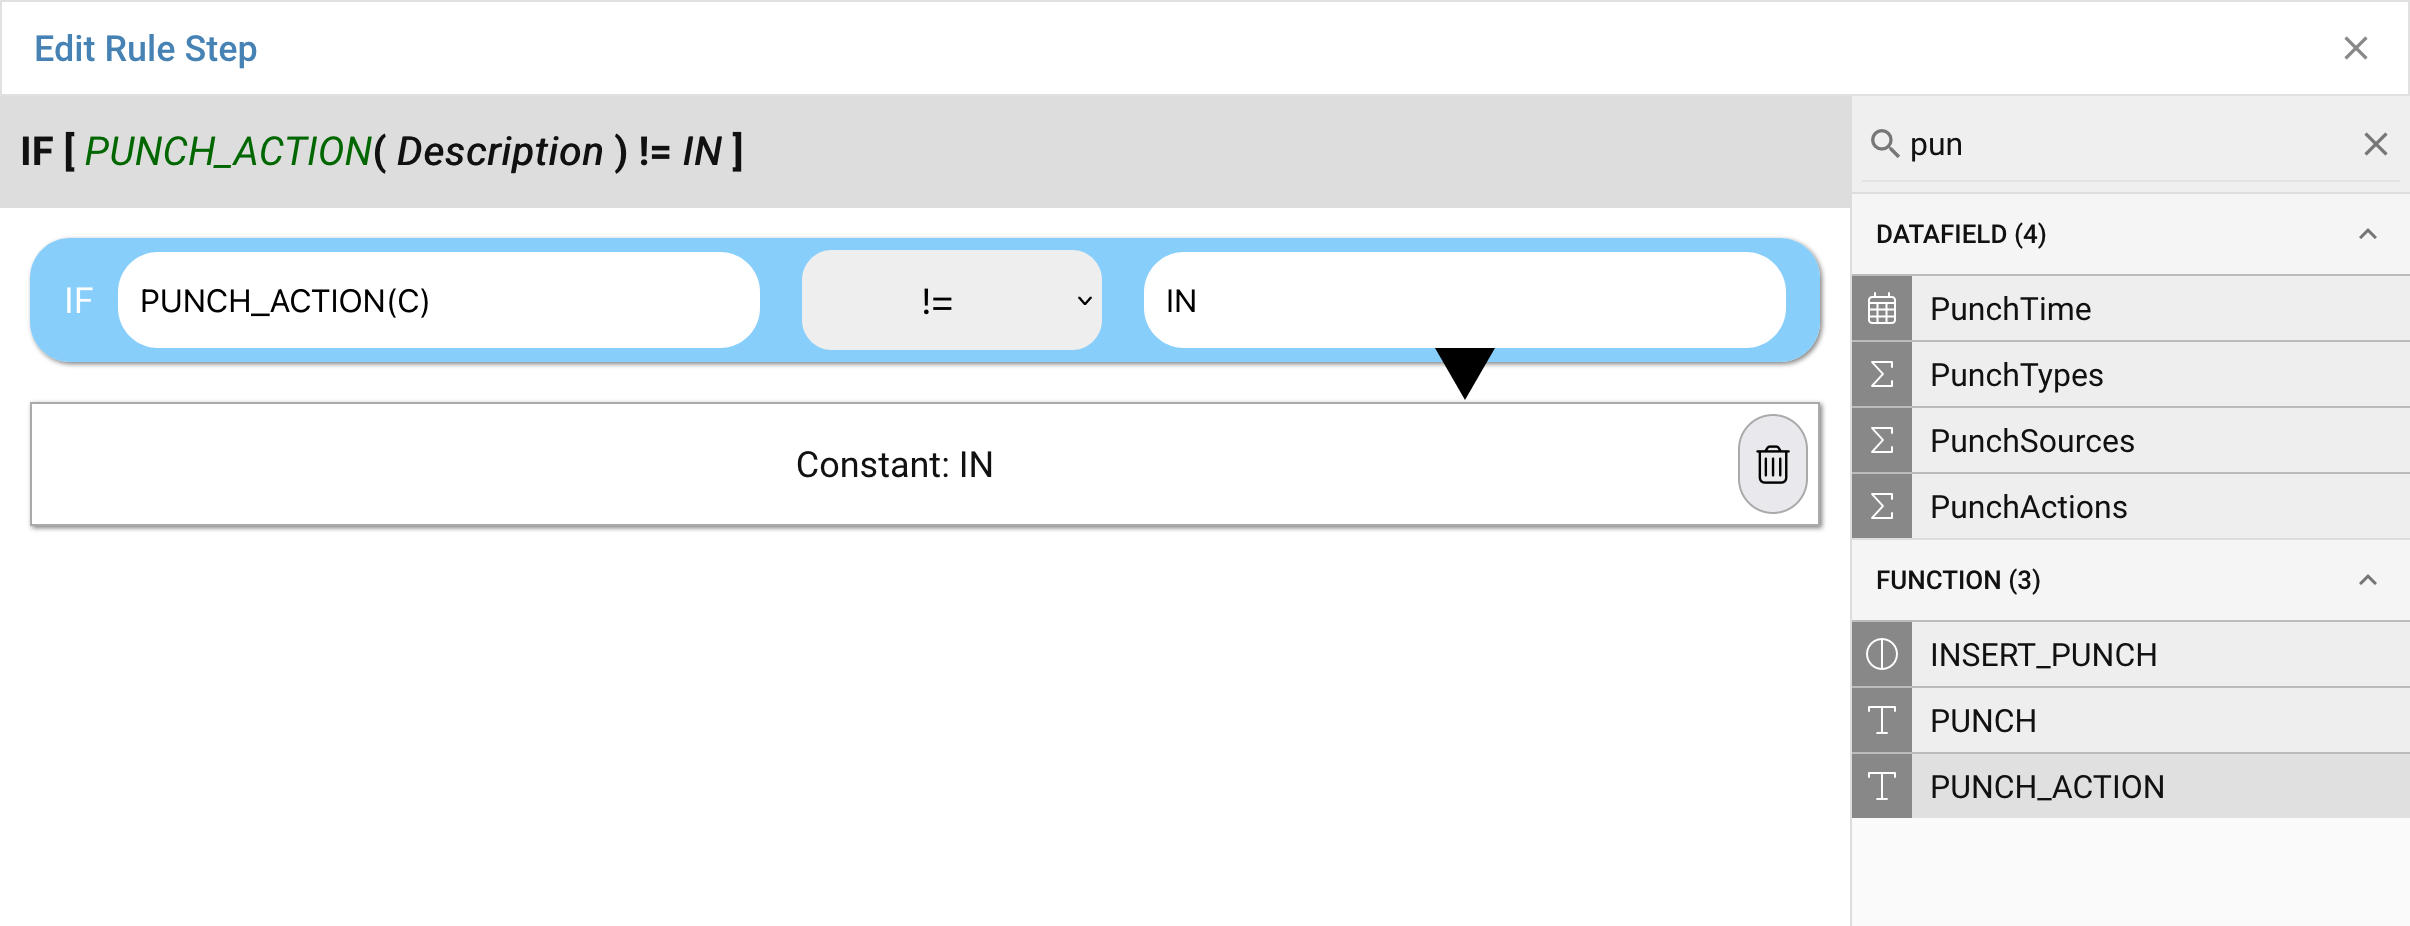
In the above, the final rule statement (which matches the first step in our table above) appears as:
IF[PUNCH_ACTION(Description) != IN]
If you're read the sections on Functions then you'll recall that the general form of an IF operation is:
IF(condition, operator, value) -> then do something
So here our condition is PUNCH_ACTION(Description) which is a function that returns the Description attribute from the current record. If that value IS NOT IN, then we want to fall out of the rule execution.
You'll notice there is no use of quotes to denote strings vs numbers, etc. IN in the above case is simply IN vs "IN". The data typing used when creating rule parameters insures that the rules paring knows what type of data to expect.
Now lets take a look at how the workflow has been updated as a result of the above rule statement:
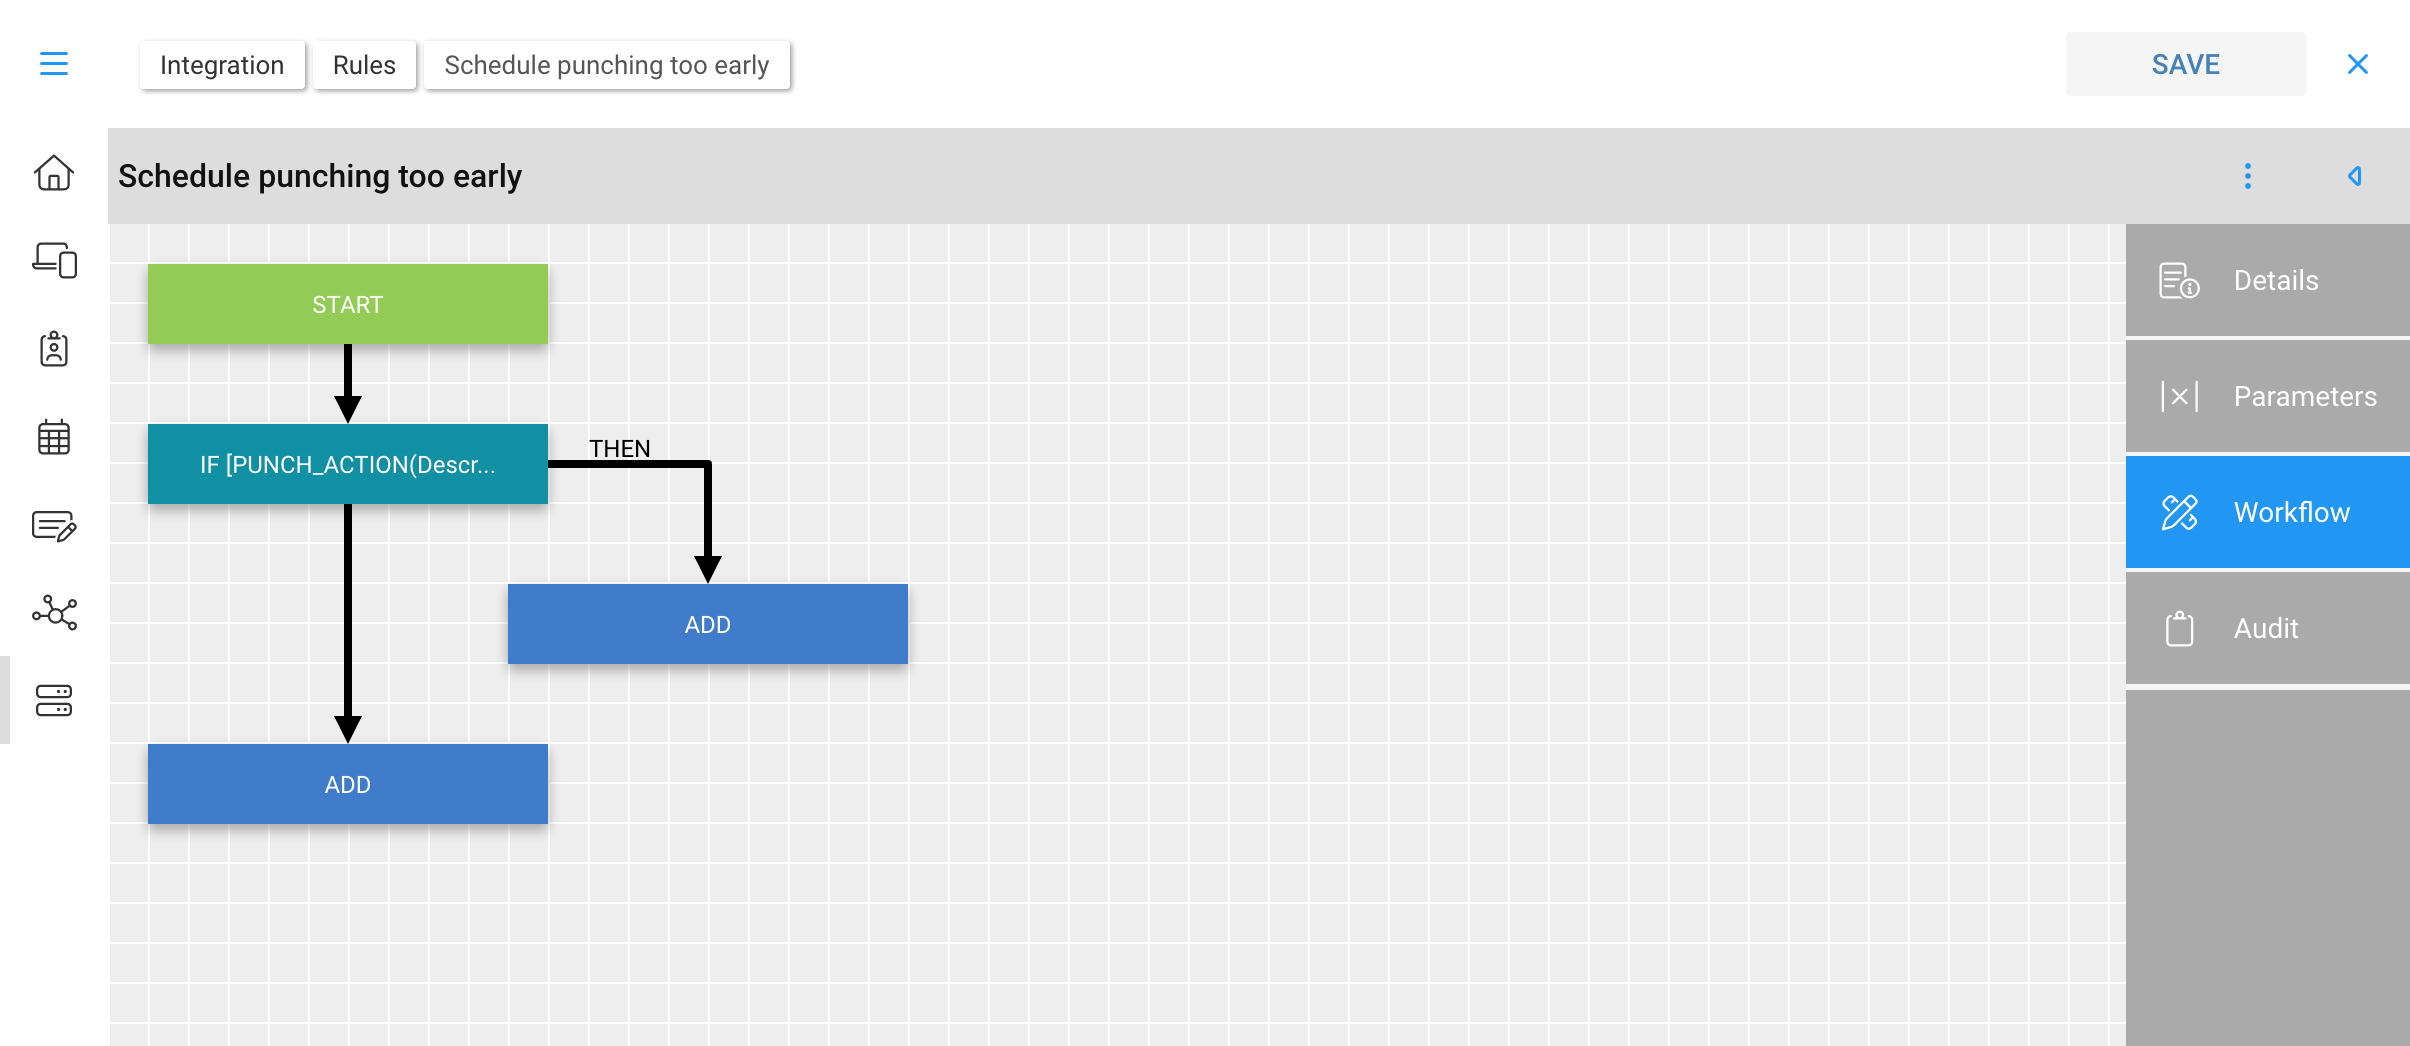
The result of the IF operator was to add a THEN branch to the right, followed by a new ADD. We now have two branches. Clicking on the ADD in the new branch offers the following options:
| Operation | Description |
|---|---|
| IF/THEN | Perform a logical test |
| SET | Assign a value to something |
| DO | Do an assignment without a return result |
| DONE | Fall out and end rule execution |
At this point in our rule, we have determined that the punch is not an IN, so the rule needs to quietly exit and stop execution. From the ADD menu, choose DONE to update the branch and terminate its execution.

Continuing with the rest of the rule statements as outlined in Attendance, early arrival, we get the final rule workflow:
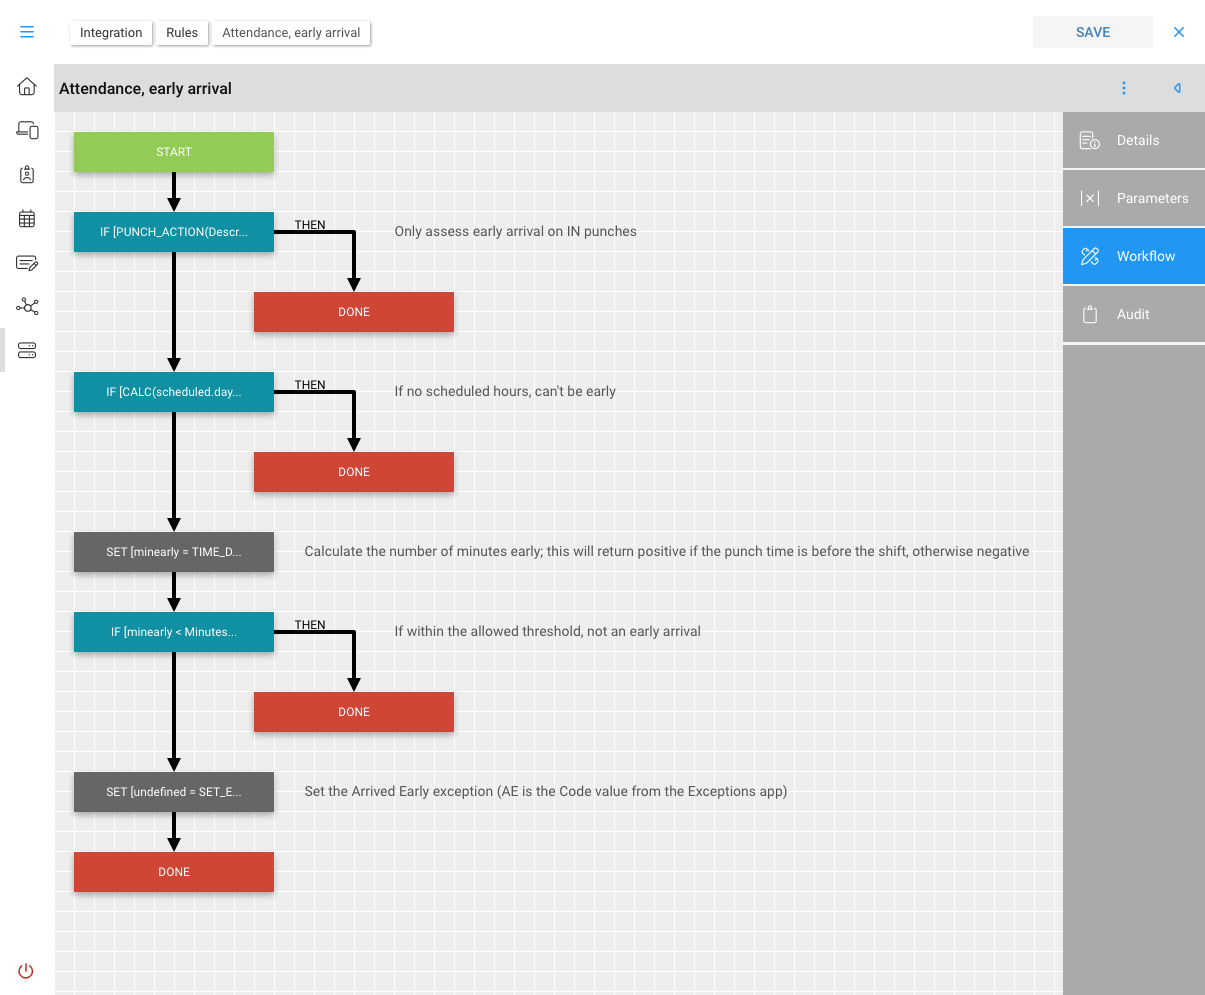
Notice the use of Comments at each step to make scanning the overall rule easier, without having to further inspect each rule statement.
Flow Control
After creating the IF in the above scenario, we clicked on ADD an chose the DONE operation to end the branch. There are a few new options available when branching, depending on the type of step and where in the branch (main or child) you are:
| Operation | Description |
|---|---|
| IF/THEN | Perform a logical test |
| SET | Assign a value to something |
| DO | Do an assignment without a return result |
| Add Step Before | Add a new rule statement before the current statement |
| Add Step After | Add a new rule statement after the current statement |
| Continue Execution | When on a child branch, will merge execution back with the prior branch |
| DONE | Fall out and end rule execution |
Most of the time child branches will end with a DONE, as you've encountered a reason to disqualify a rule from continuing. Sometimes you'll use the child branch to perform secondary or temporary calculations, then want to return to the prior or parent branch. This is where the Continue Execution is used, as shown below:
A good example of flow control continuation is the California Overtime Rule
Now that we've covered workflow and the overall strategy of a rule, next we'll look at the rule statement editor.