Mapping
The actual copying of source data to target fields is handled by the Mapping page of the import app. Not all fields in the source data need to be mapped, so you can choose those fields which are meaningful for the data import.
There are three types of mapping relationships:
- Direct: the source value is copied directly to the target field
- Translations: the source value is translated, then copied directly to a target field
- Scripts: the source value is processed by Rule Scripts using the Rules interface; this exposes the underlying Functions assets for parsing and processing the source data
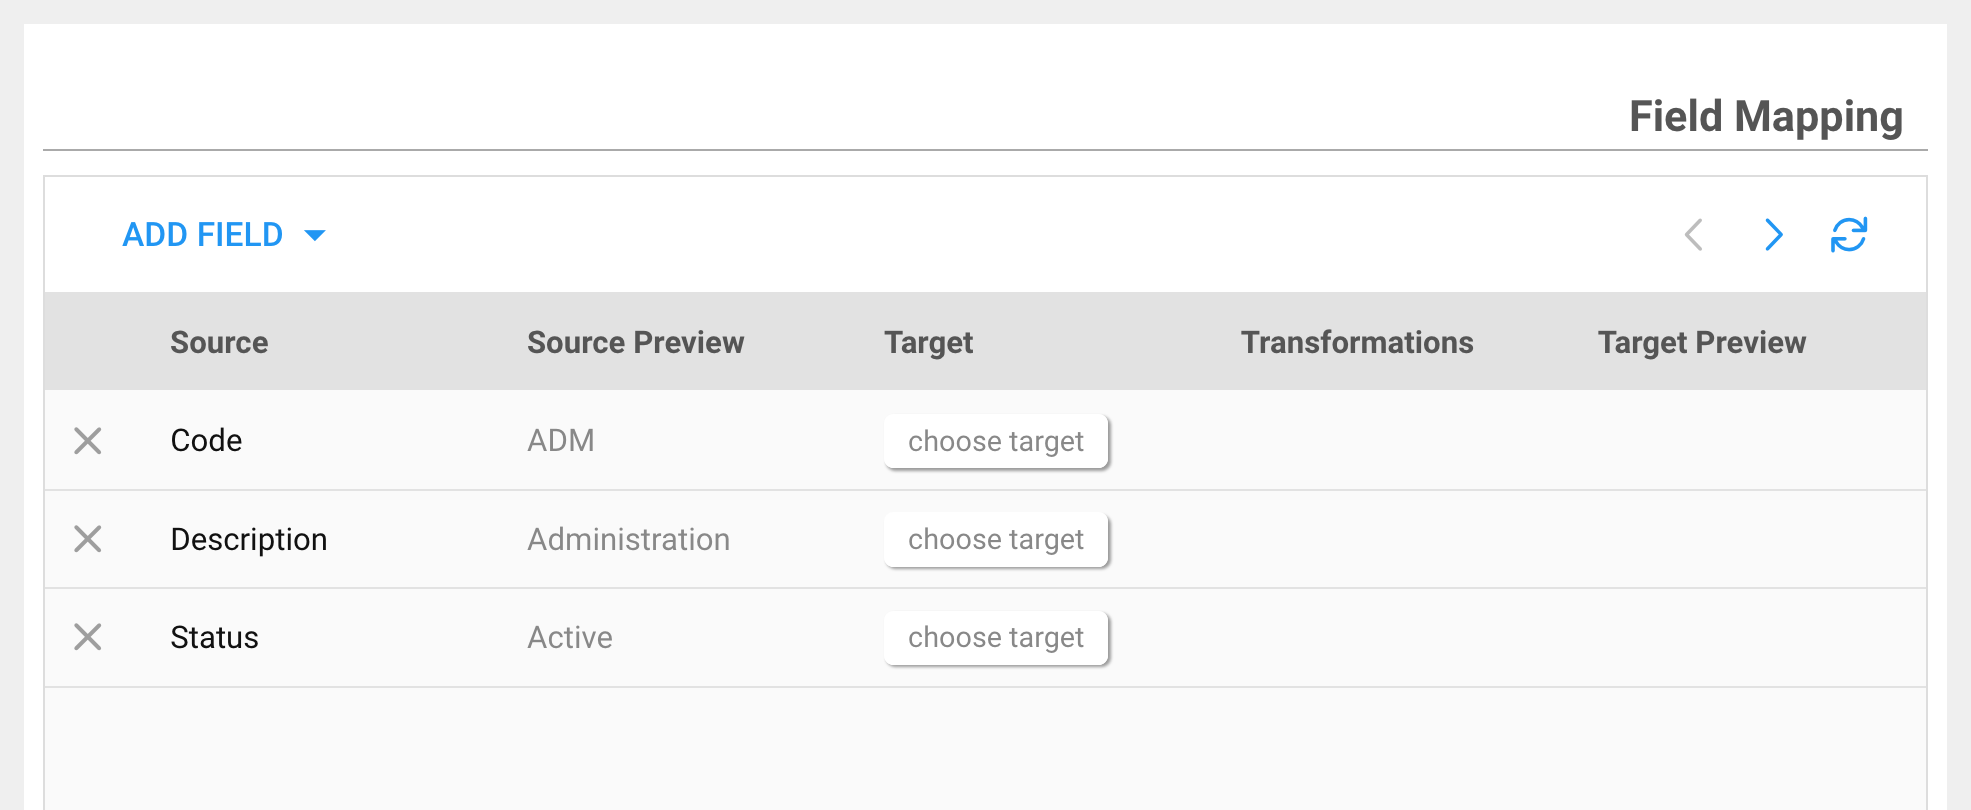
The Mapping grid presents a list of all incoming source fields. The Target column is used to map a column to a field in the target data store. After choosing a Target, additional options are available in the Transformations column for accessing the Script and Translate tools.
Direct
Direct mappings are those that require no translation or parsing of the incoming data, and are mapped "as-is" to the target field.
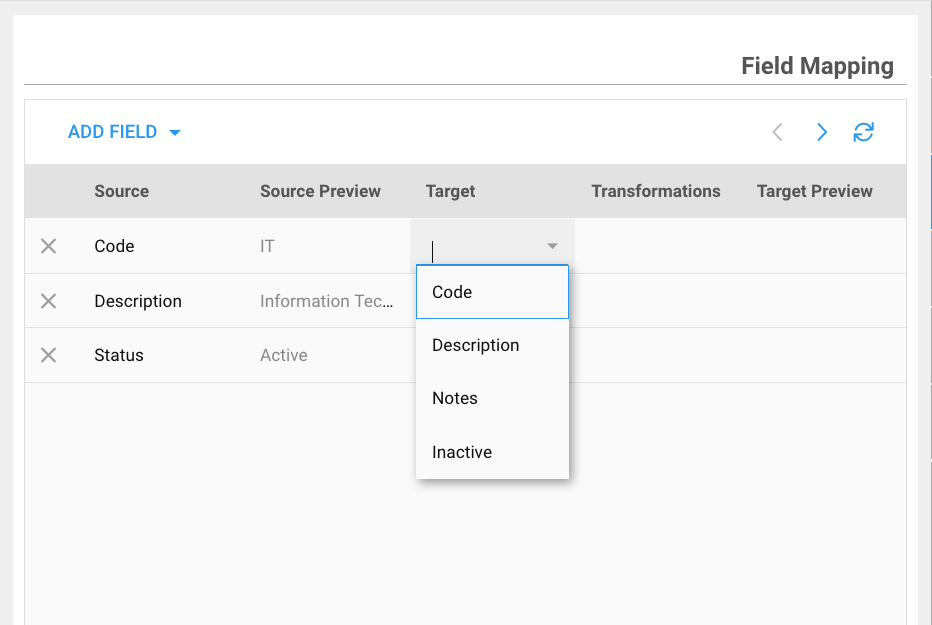
Click on
Choose targetto display the drop-down of all target fields
In the Target column you can select the target field from a drop-down. The list of fields presented is derived from the Target table chosen on during the Add Import Wizard, and also at the Details page.
Use the < > arrows above the Mapping grid to navigate forward/backward through the source data to preview the source and converted target columns.
You can skip any source field that is not needed in the target store. The unused fields can remain in the Mapping grid, or you can remove them by pressing the X at the header of any row. Fields can be re-added using the ADD FIELD button on the top of the Mapping grid.
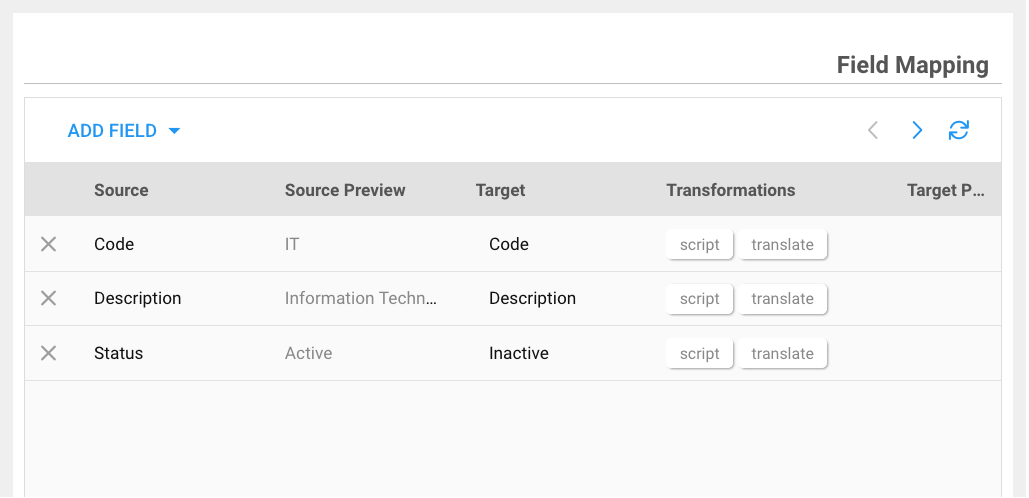
The above shows our four incoming source values being mapped to their similarly named (but not necessarily the same) target values. After selecting a Target for any given row, the additional tools for script and translate become visible.
Translations
Translations provide a simple table whereby you can map a list of incoming values to desired translated values. In our Departments example, the translation table for the Status field would be as follows:
| Status (source field) | Inactive (target field) |
|---|---|
| Active | false |
| Inactive | true |
The above feels backwards as the source Status of Active needs to map to a target's Inactive value of false, and Inactive maps to true. Each case will be different based on the intent and context of the field.
Press the
Translatebutton to open the Translate dialog
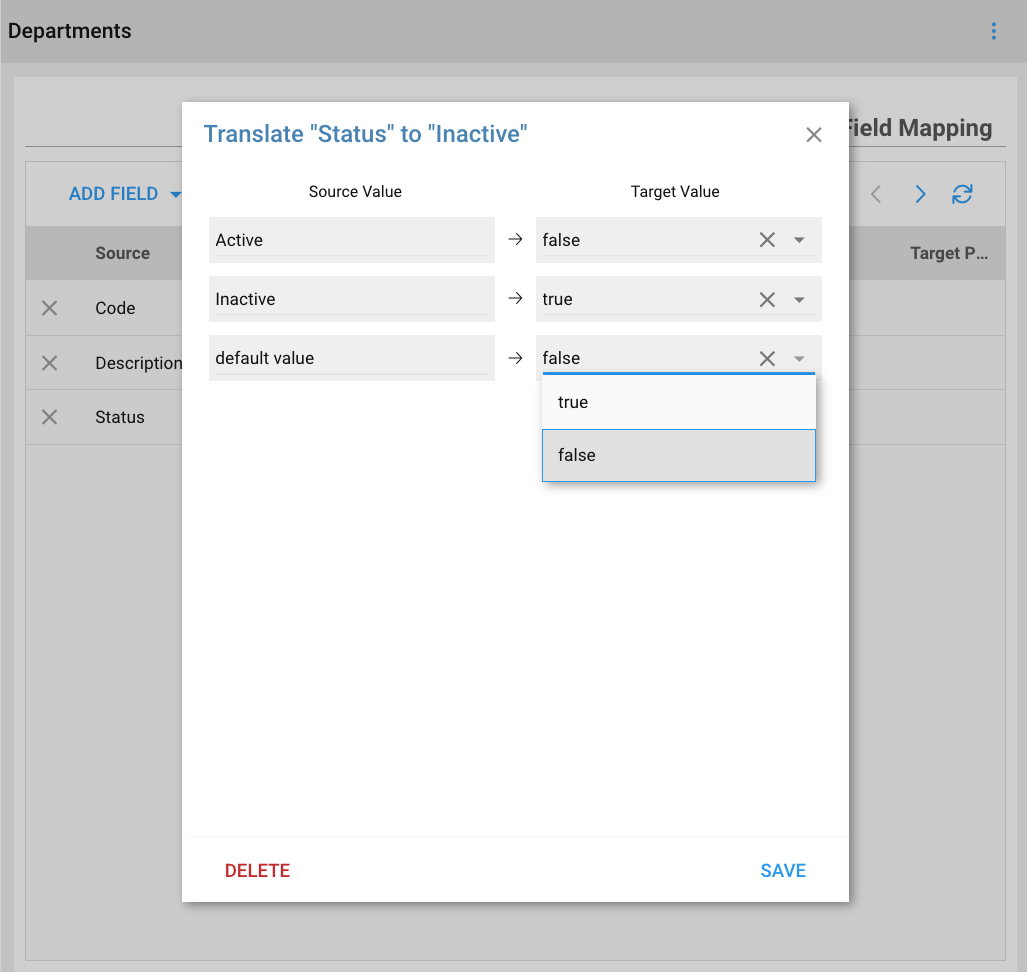
Use the Translate dialog to create one-to-one mappings for each possible source value. The columns on the left under "Source Value" have been pre-populated with every distinct value found in the source file. Use the fields under "Target Value" to select the translated value.
The system knows what kind of data is supposed to be in the target field, so will display a drop-down selection based on the expected data type. For boolean (true/false), the menu will display the same (as shown above). For lookup fields or those that have enumerated values, the drop-down will show the available choices. If the target is simply a text field, you can enter any value into the Target Value.
The pre-populated values on the left are based on observing what's in the current source file. Its entirely possible that the source file doesn't contain every possible value (e.g. what if none of the current Departments was Inactive, we'd not know of its existence.) To that extent, when first creating imports, you may want to stage a file that contains at least of of every possbile value for fields which will be translated.
The default value choice is always listed on the bottom of the list of distinct source values. This acts as a placeholder for any row that does not match the translation table (such as in the note above suggesting you insure all values are present when first importing a file.) In this example, if a new Status of Pending appeared one day, it would fall to the default value row and be translated to its respective value.
Scripts
Scripts provide full access to the Rules interface, which exposes Functions to allow total parsing and manipulation of the source data. Our Departments example doesn't contain any complicated data which could use a script, so lets look at a different example, one of importing from an employee source file:
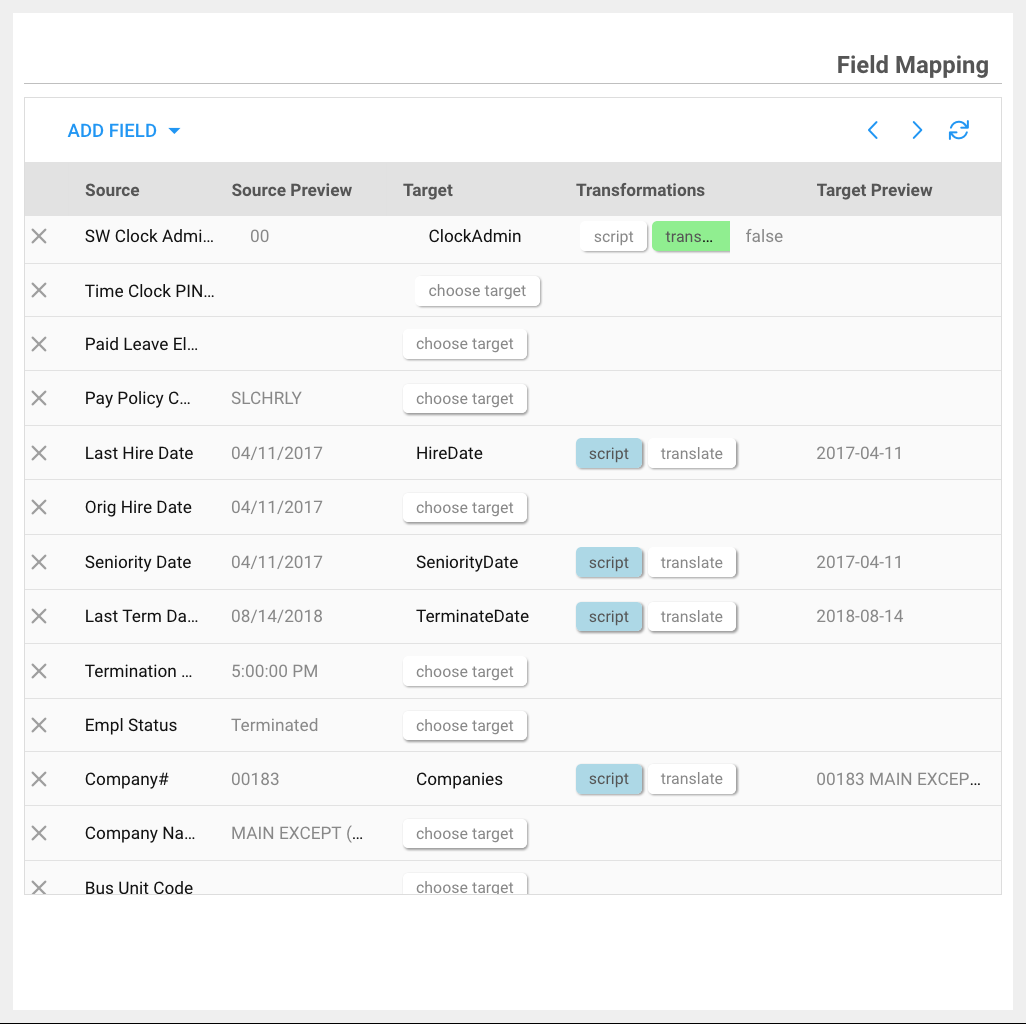
Employee import showing use of Script and Translate tools, noted by the hi-lighted button under Transformations; those rows with active scripts are in blue, active translate tables are in green.
Function Examples
- Date Function
- Lookup Function
- Common Function
Date Function Example
Lets take a look at how a date field uses a script to convert from one format to another.
Press the
scriptbutton on one of the dates rows to show the Script Editor tool
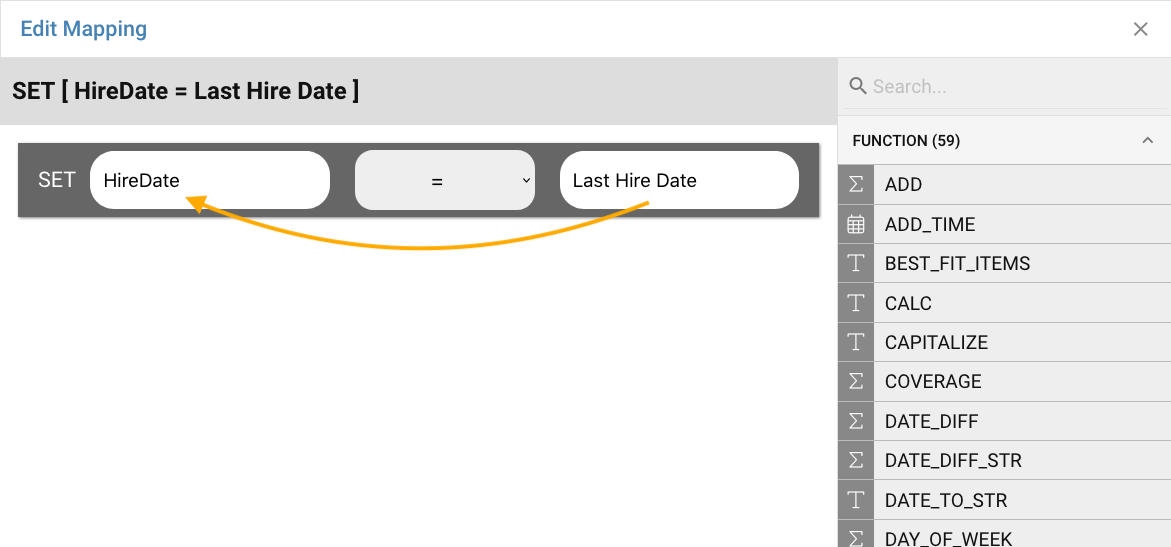
By default, the script tool shows the SET operation and in this case is applying the Last Hire Date to Hire Date, basically the same end-result as a direct copy (this is pre-filled in as you've already mapped the two fields together at the prior screen)
Next, we fill-out the formula editor with a function which will convert the date into the format we need.
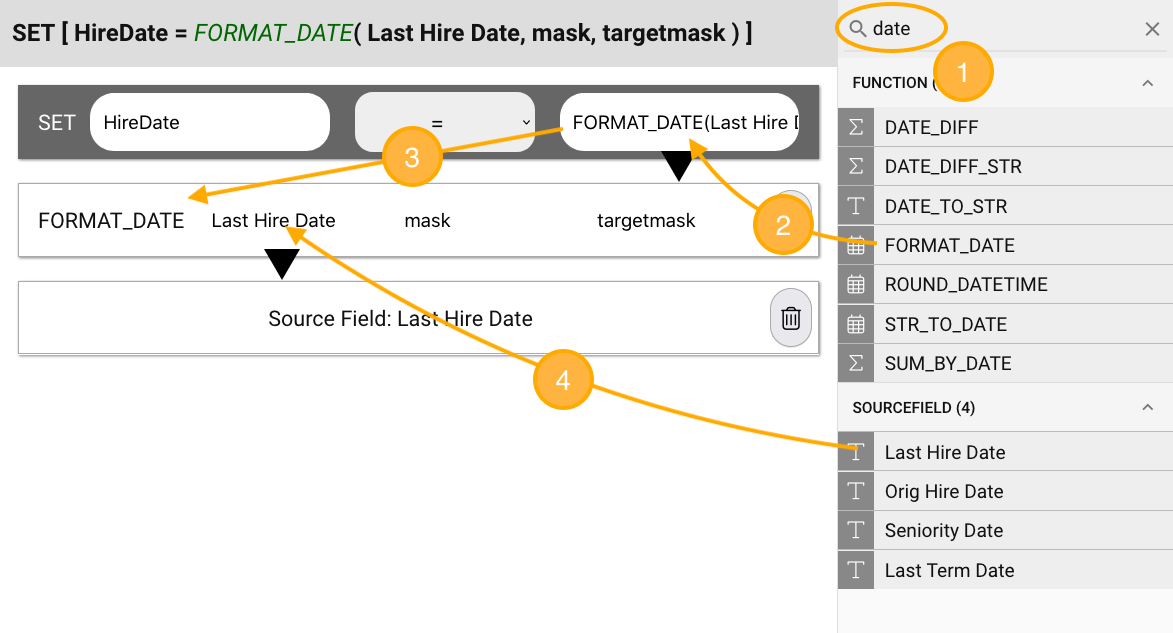
Here are the steps to completing the date format formula:
-
We search for
datein the search box in the upper right to search functions and data fields for things like "date" -
Drag (or type) the FORMAT_DATE function into the formula editor's right-side cell, overwriting the
Last Hire Datefield -
You'll now see the FORMAT_DATE function listed on the row below along with its three input parameters:
date,maskandtarget mask -
Drag (or type)
Last Hire Datefrom the search results into the first parameter of the FORMAT_DATE function.
In most cases with dates and other common conversions, the function will have a few default values that it will try automatically, so in this case the mask and target mask are optional and can be left blank. The function will try a few common ones and usually make the correct decision. If needed in this case, the mask could be entered as %m/%d/%Y which represents the source values such as 04/11/2017 and the target mask would be the standard SimplyWork date format of %Y-%m-%d which corresponds to a format of 2017-04-11. No quotes are used when entering constant values such as a mask.
The completed function is:
SET[ HireDate = FORMAT_DATE(Last Hire Date, )]

SET[ HireDate(3) = FORMAT_DATE(2)(Last Hire Date(1), )]
Which means: take the value from the source data's Last Hire Date (1) as the first parameter input into the function FORMAT_DATE (2); store this result in the HireDate (3) field of the target (Employees.HireDate).
Lookup Function Example
Another common script function is LOOKUP which will take a source value, such as a Department Code, and lookup the internal reference for attaching that code to an employee.
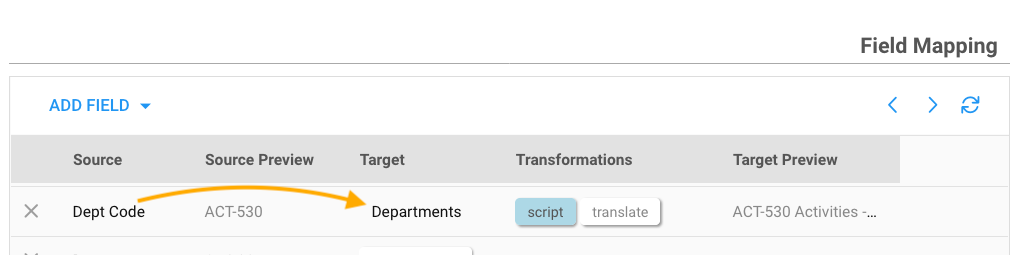
In the example above, we've already direct mapped the Dept Code source field to the Departments target field. In this case, Departments is a referential lookup to the Departments data store from the employee data store. As such, we don't actually store the Department's Code in the Employee data store, rather a reference to the row that is described by Code. The tables below show the relationship between an Employee record and the related lookup values:
Employee Store | Value | | ID | Value | Lookup Store
:- | :- | -:- | :- | :- |:-
Number | 12345 |||
Lastname | Mouse |||
Firstname | Mickey |||
Departments_ID | [internalref]| < | [internalref]| Departments.Code=MAIN | Departments.Description=Maintenance
Positions_ID | [internalref]| < | [internalref]| Positions.Code=ENG | Positions.Description=Engineer
... |
In the psuedo mapping above, the import app will search for MAIN on the Departments.Code field (datastore.field) and upon locating the matching record, returns its [internalref] which is then stored in the Employee record. In this way you can freely change the Departments.Code value (say from MAIN to MTNC) and not disrupt any related records. The [internalref] is autogenerated, immutable and largely not visible.
Lets take a look at the formula expression for performing the Department lookup.
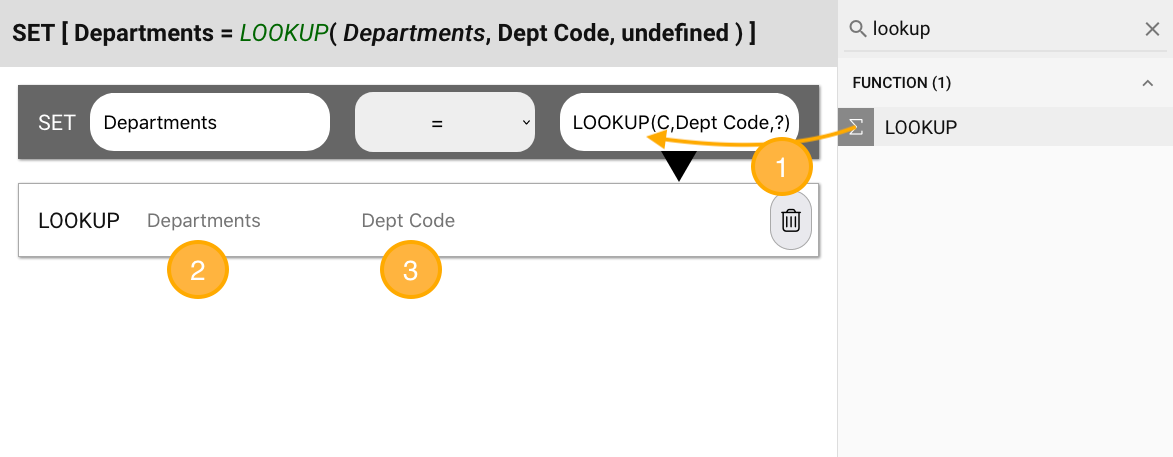
The steps in this example are:
-
Search for LOOUP, then drag (or type) the LOOKUP function into the right-side cell of the SET statement
-
The LOOUP function bar appears below along with its two parameters:
tableandfield. EnterDepartmentsfor the lookup table (this is the datasource where all Department records are stored) -
Enter
Dept Codein the second parameter; this is the incoming source data value which we are mapping to the Employees.Department field.
The completed function is:
SET[ Departments = LOOKUP(Departments, Dept Code, )]

SET[ Departments(4) = LOOKUP(Departments(2), Dept Code(1), (3) )]
Which means: take the value from the source data's Dept Code (1) and search the datastore Departments (2) to find [internalref] (3); store this value in the Departments (4) field of the target (Employees.Departments_ID).
As with the DATE_FORMAT function used previously, some parameters are optional so can be left blank. In this case the function signature is LOOKUP(table, value, column, returncolumn). The first two are required as that tells the lookup function a) what datasource to serach, and b) what value to look for. The third column in this case is the field in Departments to search on (always defaults to Code using our design language) while the final column is what to return--by default always returns the [internalref].
Common Functions
The following are some of the more common functions used during data imports. The full Functions list contains many additional functions which can also be used.
| Function | Type | Use |
|---|---|---|
| FORMAT_DATE | Date formatting | FORMAT_DATE(value, mask, targetmask) |
| LOOKUP | Find related value | LOOKUP(tablename, value, column) |
| LSTRIP | String parsing | LSTRIP(value, chars) |
| REPLACE | String parsing | REPLACE(value, searchfor, replacewith) |
| RSTRIP | String parsing | RSTRIP(value, chars) |
| SLICE | String parsing | SLICE(value, start, end) |
| SPLIT | String parsing | SLICE(value, delimiter, index) |
| STRIP | String parsing | STRIP(value) |
| WORDSLICE | String parsing | WORDSLICE(value, start, end) |
| ZFILL | String parsing | ZFILL(value, length) |
Adding Fields
Fields can be added using the ADD FIELD button on the top of the Mapping grid. There are a couple of use-cases where you might want to add a field:
| Use-Case | Notes |
|---|---|
| Restore deleted | If a previously unused field was deleted, this allows you to put it back into the list |
| Add Twice | There are times when a single source field might be the input to multiple target fields; for example, a hypothetical source value titled "GL-ALLOCATION" could be composed of a {GL-DEPT} combination, such that you'd pull the first component out to populate a CostCenter and the latter component for a Department using a SPLIT function. |
| Add Virtual | In this case, choose No source field from the Add Field drop-down; this allow you to insert a Rule Script which could pull from any source field (or no source field) and still generate a target value. A common use-case may be to seed default values into the target which are not dependent on any source value (e.g. Imported = 1 assuming there was a target column titled "Imported") |
The field list order is not significant, so if a field is added at the bottom, its mapping is not affected by the position as each row is processed independently of any other row.
Previewing
Use the < > arrows at the top of the Mapping grid to navigate forward or backwards through the source data. Each row's raw source field, along with the translated target value, are presented. This is useful to insure the target value appears as intended.
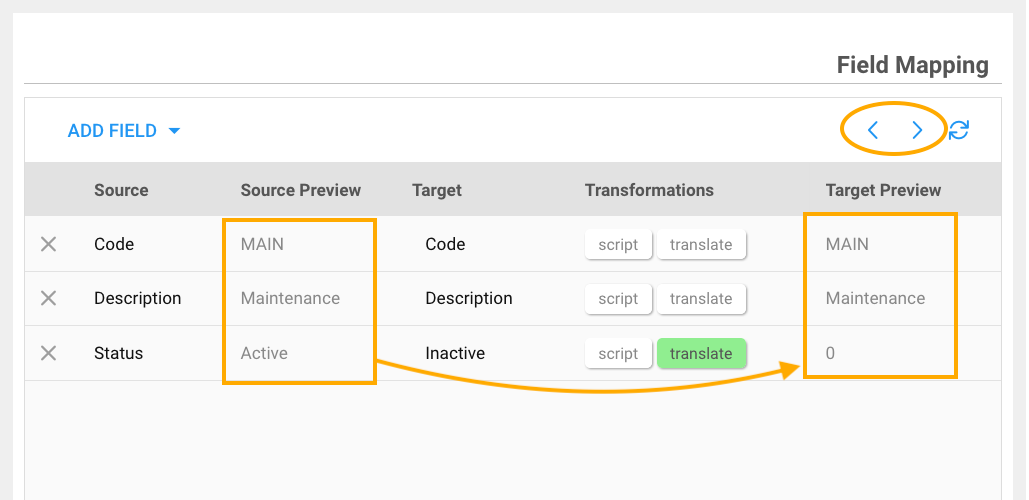
While the tools here show the boolean type fields as true/false, internally they are stored in numeric format: 1 and 0 so the translate tool above converts Active to false as the Target field of "Inactive" is a boolean datatype. However, false is further translated internally to 0 before begin stored in your data stores. You can use the two variants interchangeably through out the system as the data stores will accept either format.
Next we'll look at scheduling imports to run automatically.