Import Wizard
Lets start by importing a sample Departments list. We'll walk through the steps of selecting the file, previewing the source and deconstructing the underlying format.
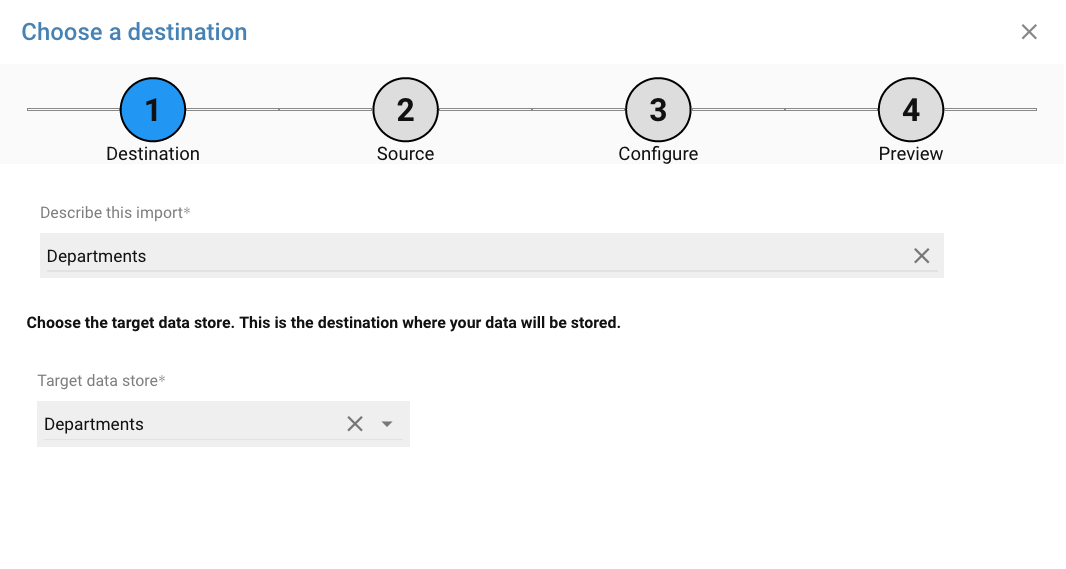
Selecting a Target Data Store
Use the search tool to find the Data Imports app, or browse to the app via the System/Integration Tools menu
The first step in creating a Data Import will be to give it a name and select a target data store. Data stores are any type of data within the SimplyWork platform, including new stores which you can create using the User Schema tool. For this example, lets choose Departments, then press Next.
Choosing the Incoming Source
Next we'll choose the method for fetching the incoming data. You can choose from:
- Upload a CSV, XML or JSON file
- Retrieve via SFTP or HTTPS
- POST from another system or service
File Loading Options
- Upload Manually
- SFTP and HTTPS
- POST via API
Uploading a File
If the file is available locally on your PC, and can be saved into CSV (e.g. from Excel), XML or JSON format, choose the Upload option.
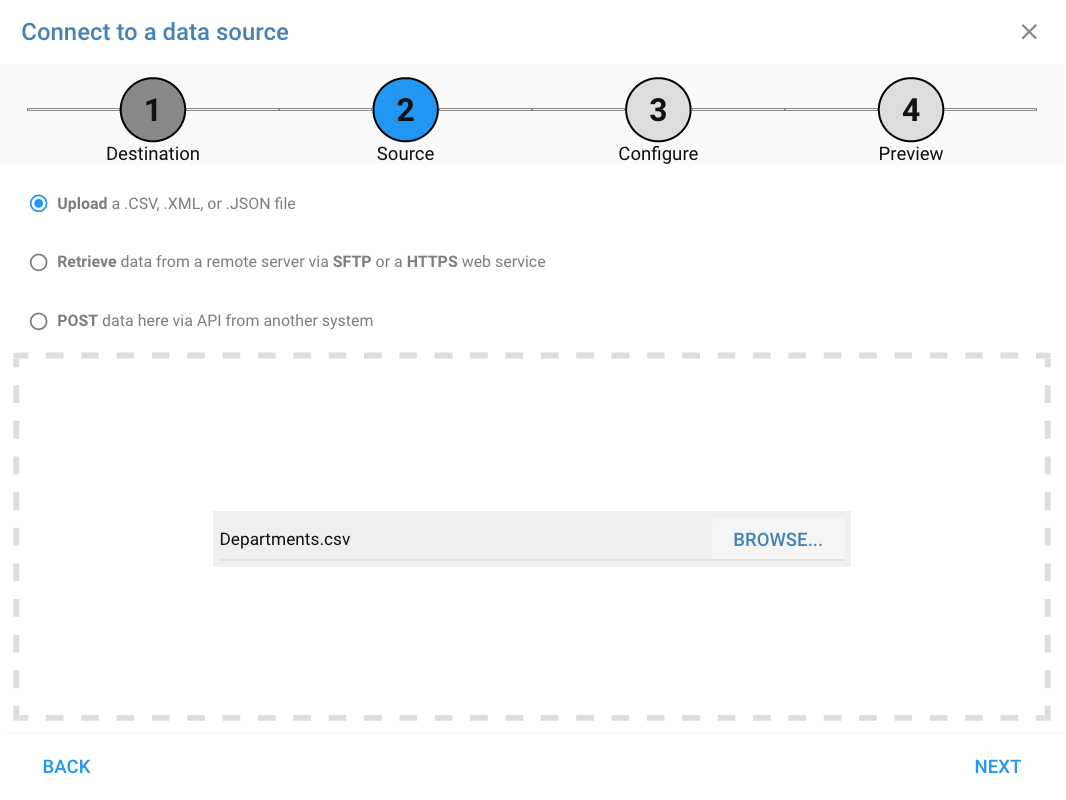
The dashed box represents a drop zone where you can drag the file from your Desktop. Alternately, use the Browse button to select the file from your local device.
Fetching via SFTP or HTTPS
If the file is published to a remote server and can be retrieved via SFTP or HTTPS (e.g. via an API), choose the Retrieve option.
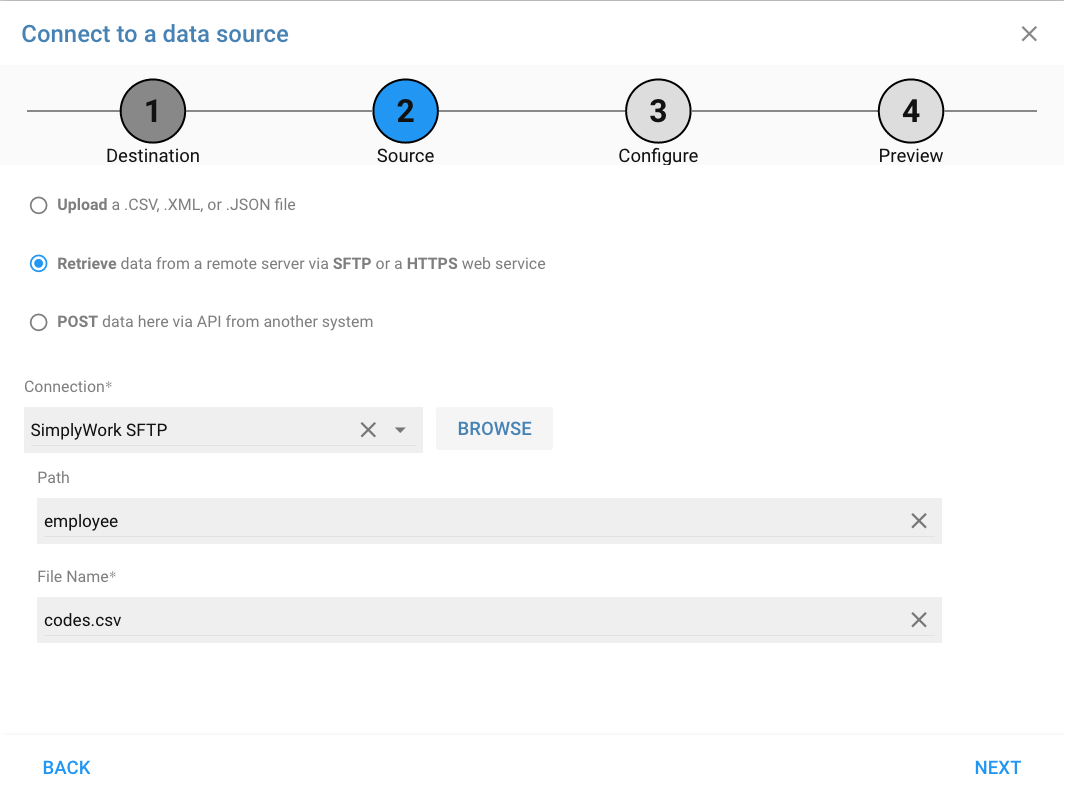
A previously created Data Connection is used to connect with the external server. In the case of SFTP, use the Browse button to select a file from a folder/library on the server.
POSTing from an External Service
If the data will be posted into your SimplyWork instance from an external service, choose the POST option.
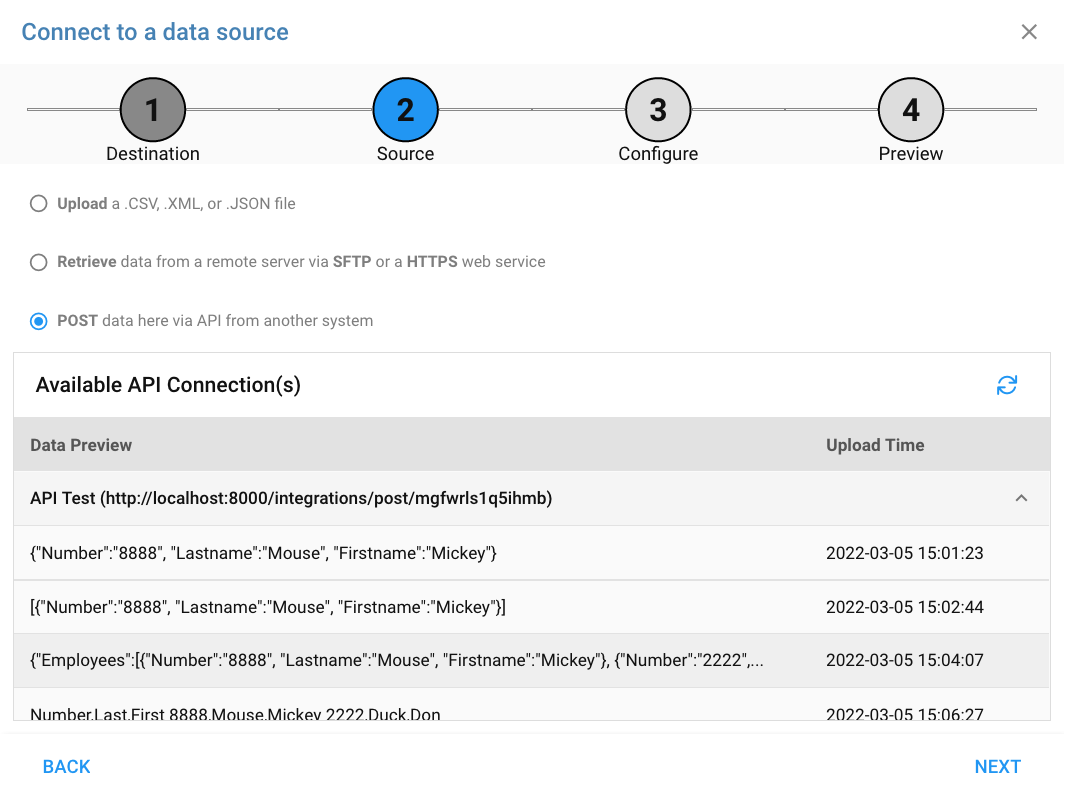
In this case you'll see a list of available API Request Queue entries (assuming some have been sent) which represent the incoming data stream from the external service.
You may see queue entries from multiple Data Connections. In this case you are selecting the data which was destined for this import target. If you don't see any entries, then you'll want to use the URL and token generated by the Data Connection to post sample requests and populate the queue.
After completing the import app for the target Data Connection, you may want to remove unused queue entries from the Request Queue Page page of the Data Connections app.
Deconstructing the Source Format
After choosing the source of the data, press Next to preview the Configure step of the wizard.
Use the File Format dropdown to choose the source format of the data. The following formats are available:
- CSV
- Fixed
- JSON
- XML
- SOAP
Source Formats
- CSV
- Fixed
- JSON
- XML
CSV
CSV is the format most of us use daily as we shovel data between emails and Excel. If starting in Excel or some other spreadsheet tool, export the data to the CSV format before uploading into the data import app.
Native Excel files cannot be imported; you must export spreadsheet files to CSV format using the "File, Export.." tools.
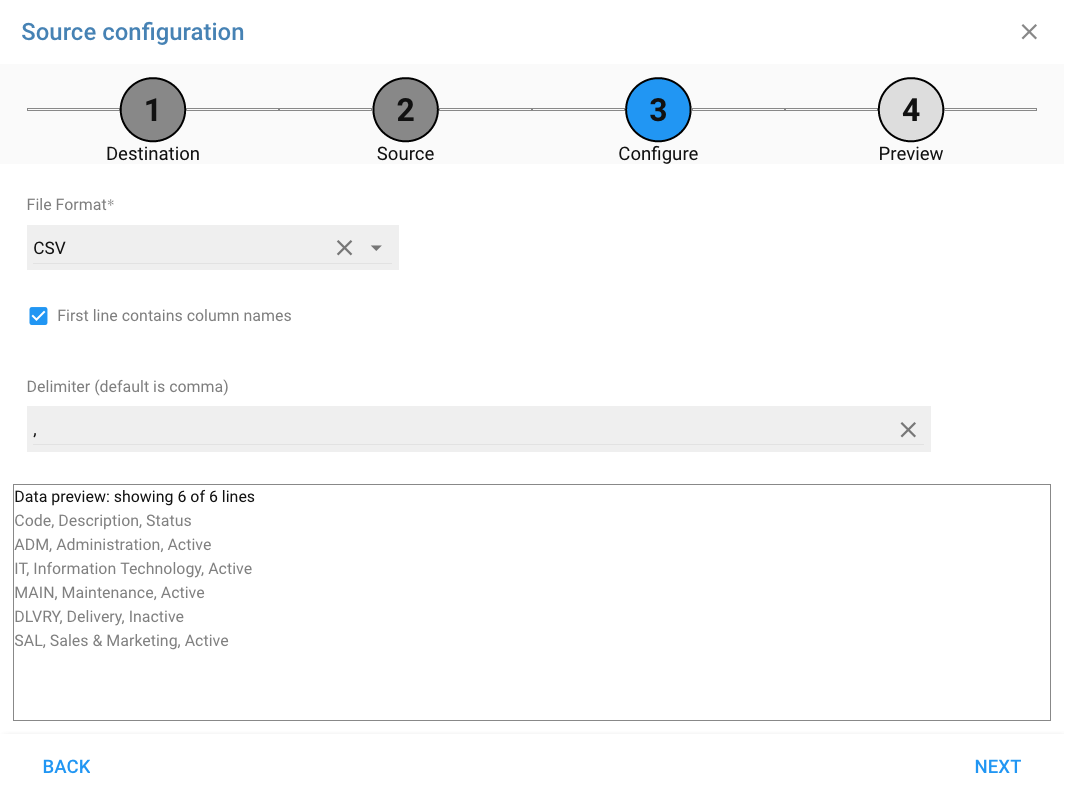
CSV formats generally include the column titles on the first row and are delimited by a comma. Update the configuration fields accordingly to disable First line column names or change the Delimiter.
Fixed
The Fixed format also uses the First line option to assist with naming columns.
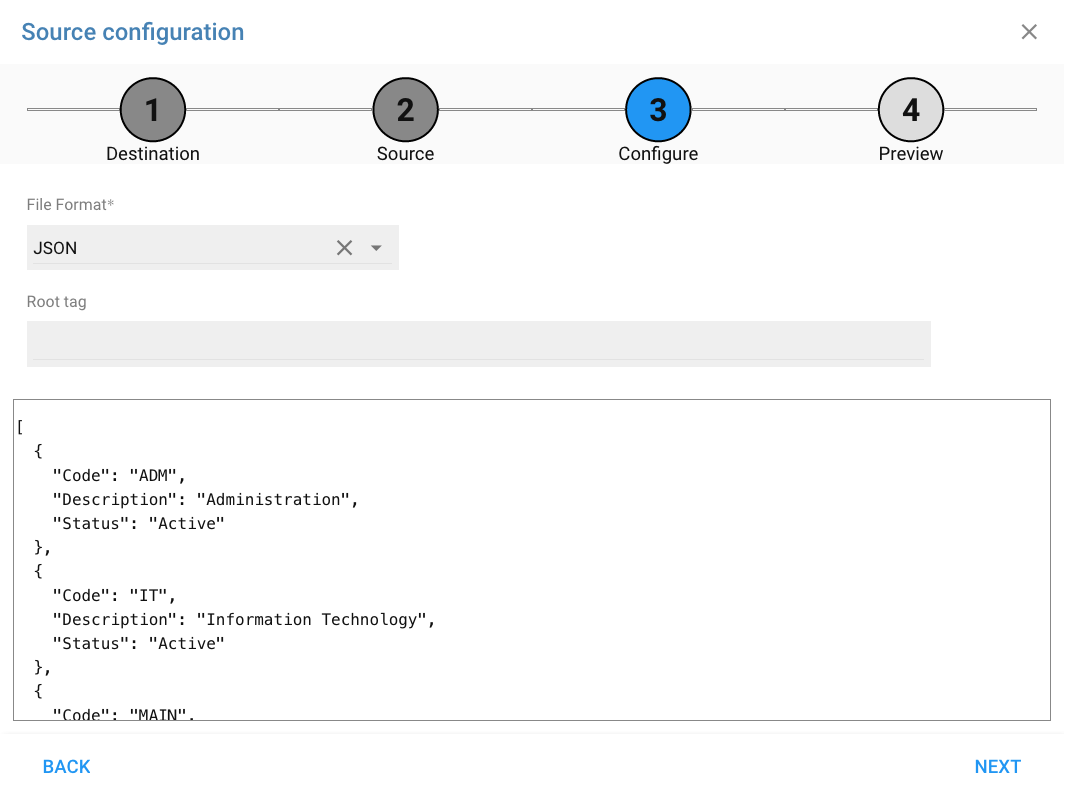
JSON
If choosing JSON, and the data is presented as an array of record objects, the import will know how to extract the member objects. The example below shows a simple JSON list, and the view after it is uploaded:
[{"Code":"ADM", "Description":"Administration", "Status":"Active"},
{"Code":"IT", "Description":"Information Technology", "Status":"Active"},
{"Code":"MAIN", "Description":"Maintenance", "Status":"Active"},
{"Code":"DLVRY", "Description":"Delivery", "Status":"Inactive"},
{"Code":"SAL", "Description":"Sales & Marketing", "Status":"Active"}]
The beauty of the JSON format, however, is that it can contain nested data within a single file. The above data could also be presented with a roottag attribute which pushes the starting point of the desired data further into the JSON object.
{"Departments":[
	{"Code":"ADM", "Description":"Administration", "Status":"Active"},
	{"Code":"IT", "Description":"Information Technology", "Status":"Active"},
	{"Code":"MAIN", "Description":"Maintenance", "Status":"Active"},
	{"Code":"DLVRY", "Description":"Delivery", "Status":"Inactive"},
	{"Code":"SAL", "Description":"Sales & Marketing", "Status":"Active"}
	], ..
}
In this new file above, the roottag attribute is Departments, so when importing this file copy the roottag into the Root tag configuration field.
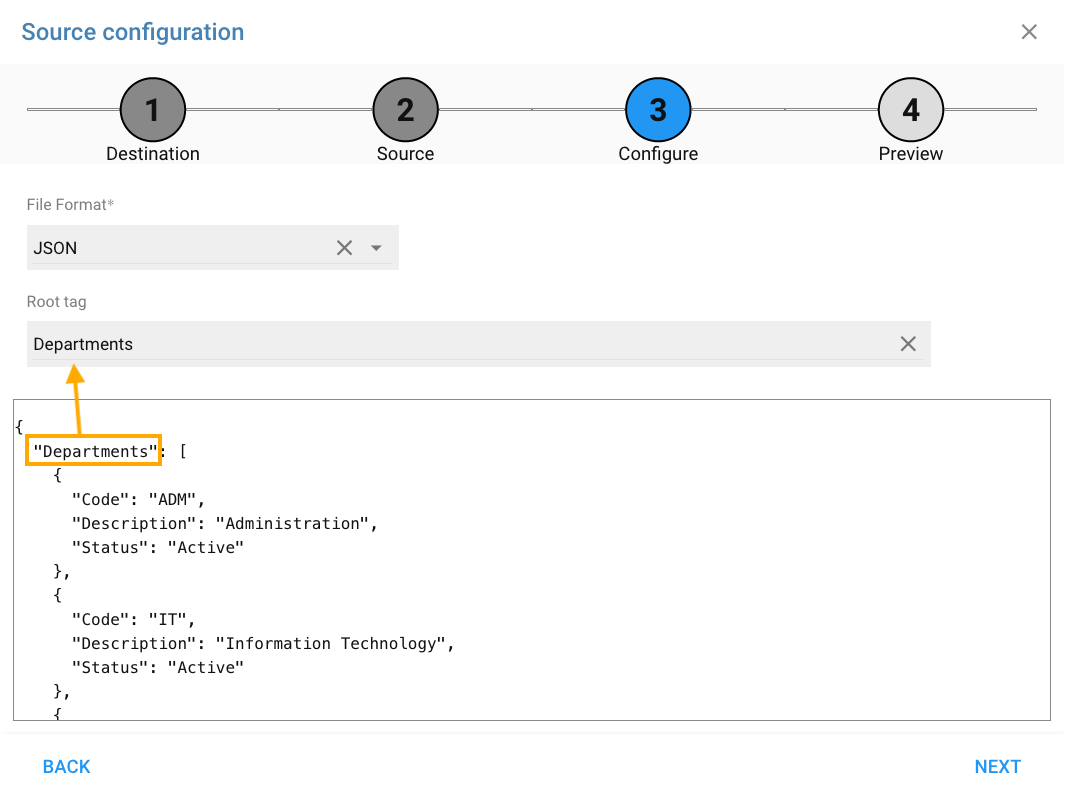
Copy the roottag from the JSON file to the configuration field to instruct the import where to find the array of JSON record objects.
XML
XML files require a little direction as the source data could be embedded further down the attribute tree. Lets review the following sample import file:
<Departments>
  <Department>
    <Code>ADM</Code>
    <Description>Administration</Description>
    <Status>Active</Status>
  </Department>
  ...
</Departments>
Here the Departments tag acts as our roottag and is the start of the array of records. The Department
tag is the start/end of each successive record. Insert these values into the configuration section of the wizard as shown below.

In the example above, the roottag and childtag are used to direct the import to the proper array of record tags.
Individual fields are extracted using the <tag>field</tag> notation, where tag in this case will become the column header for each field after the data is extracted.
Preview
After completing the configuration portion of the wizard, press the Next button to preview the source data. At this point, regardless of the original format of the file, the data should appear in a grid and be presented in properly encoded columns.
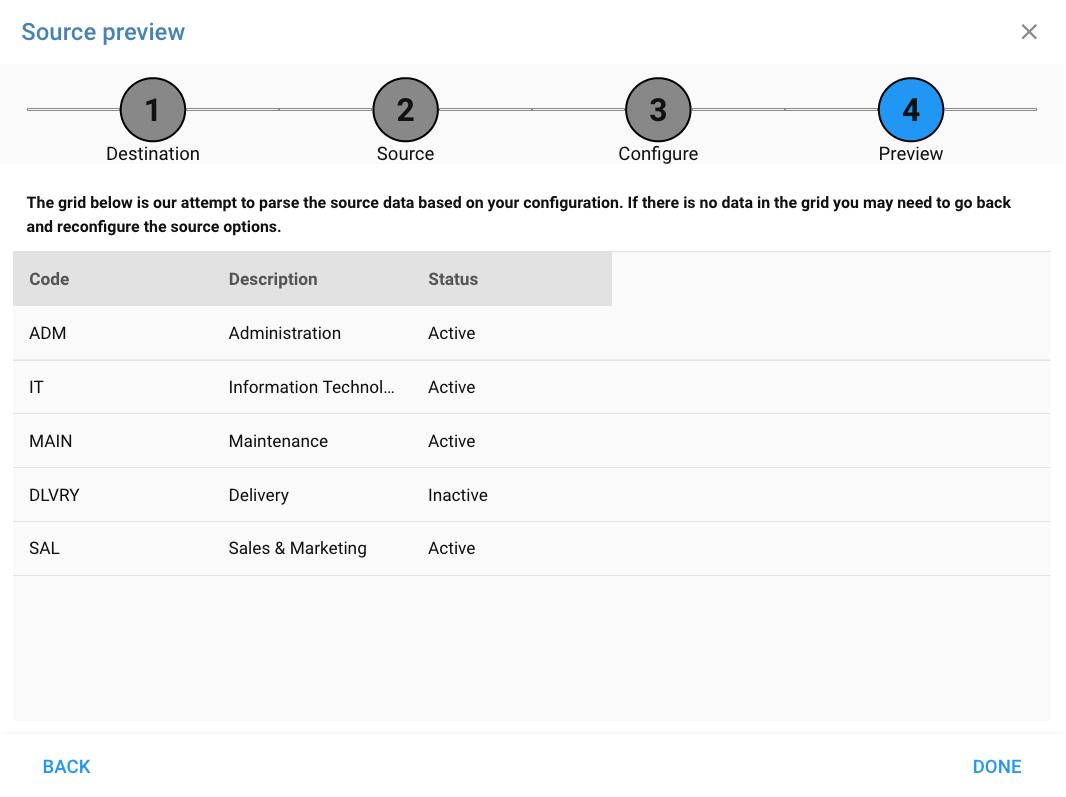
If the data isn't mapped correctly in the grid, use the Back button to go back a step and adjust the configuration of the source format.
Next we'll review the import details.