Clock Profiles
Sample Clock Profiles are included for typical time clock, web and mobile use. A profile should be created for each unique set of properties you'd like to maintain, while clocks then share profiles based on those properties. For example, hardware time clocks may contain a biometric, so the profile for those devices will contain instruction on how to authenticate with biometric. Web clocks and mobile won't use biometric (at least within the app) so require their own profile without biometric options.
Clock Profiles also control what apps are offered to users--potentially a subset of the apps available to the user via their User Profile--so can be used to manage app delivery across the family of devices. Settings such as Relay may only apply to a small number of clocks--those that will open a door upon successful identification--so those clocks would share a separate profile, even if the profile applies to one device.
Clock Profiles are located on the System Menu under Clock Management
Details
The following table summarizes the attributes on the Details card of a Clock Profile:

| Item | Description |
|---|---|
| Name | Enter a unique name for the profile (e.g. Mobile) |
| Description | Enter a more detailed description of the profile, such as how its used |
| Security Pin | A numeric PIN to secure the settings icon on the clock main screen. By default this is blank so anyone can get into the setup during initial installation, but should be assigned a value once you have established user access |
| Require identification for HR | When checked, requires badge or biometric verification in order to get into HR apps within the Settings menu. This means that any user who is allowed access to the HR functions is setup in the application with an appropriate number or biometric. Their User Profile must also assign the Clock HR policy under the Clock Access policies. |
| HR Pin | If the above is not selected, then a PIN can be used as an alternative; this allows non-users to access the HR apps (e.g. such as Enrollment) without having a user account withint the app. The HR Pin would provide a second layer of security in addition to the general Security Pin to access Settings |
| Require identification for IT | When checked, requires badge or biometric verification in order to get into the IT apps within the Settings menu. This means that any user who is allowed access to the IT functions is setup in the application with an appropriate number or biometric. Their User Profile must also assign the Clock IT policy under the Clock Access policies. |
| IT Pin | If the above is not selected, then a PIN can be used as an alternative; this allows non-users to access the IT apps (e.g. such as Network) without having a user account withint the app. The IT Pin would provide a second layer of security in addition to the general Security Pin to access Settings |
| Default profle | If checked, then this becomes the default profile for any device which does not have a profile. Normally, hardware time clocks and web clocks will be assigned a profile during registration. Mobile users may not have a profile, so will use whichever Clock Profile is setup as the default (and only one should be designated as Default). |
Identification
The following table summarizes the attributes on the Identification card of a Clock Profile:
| Item | Description |
|---|---|
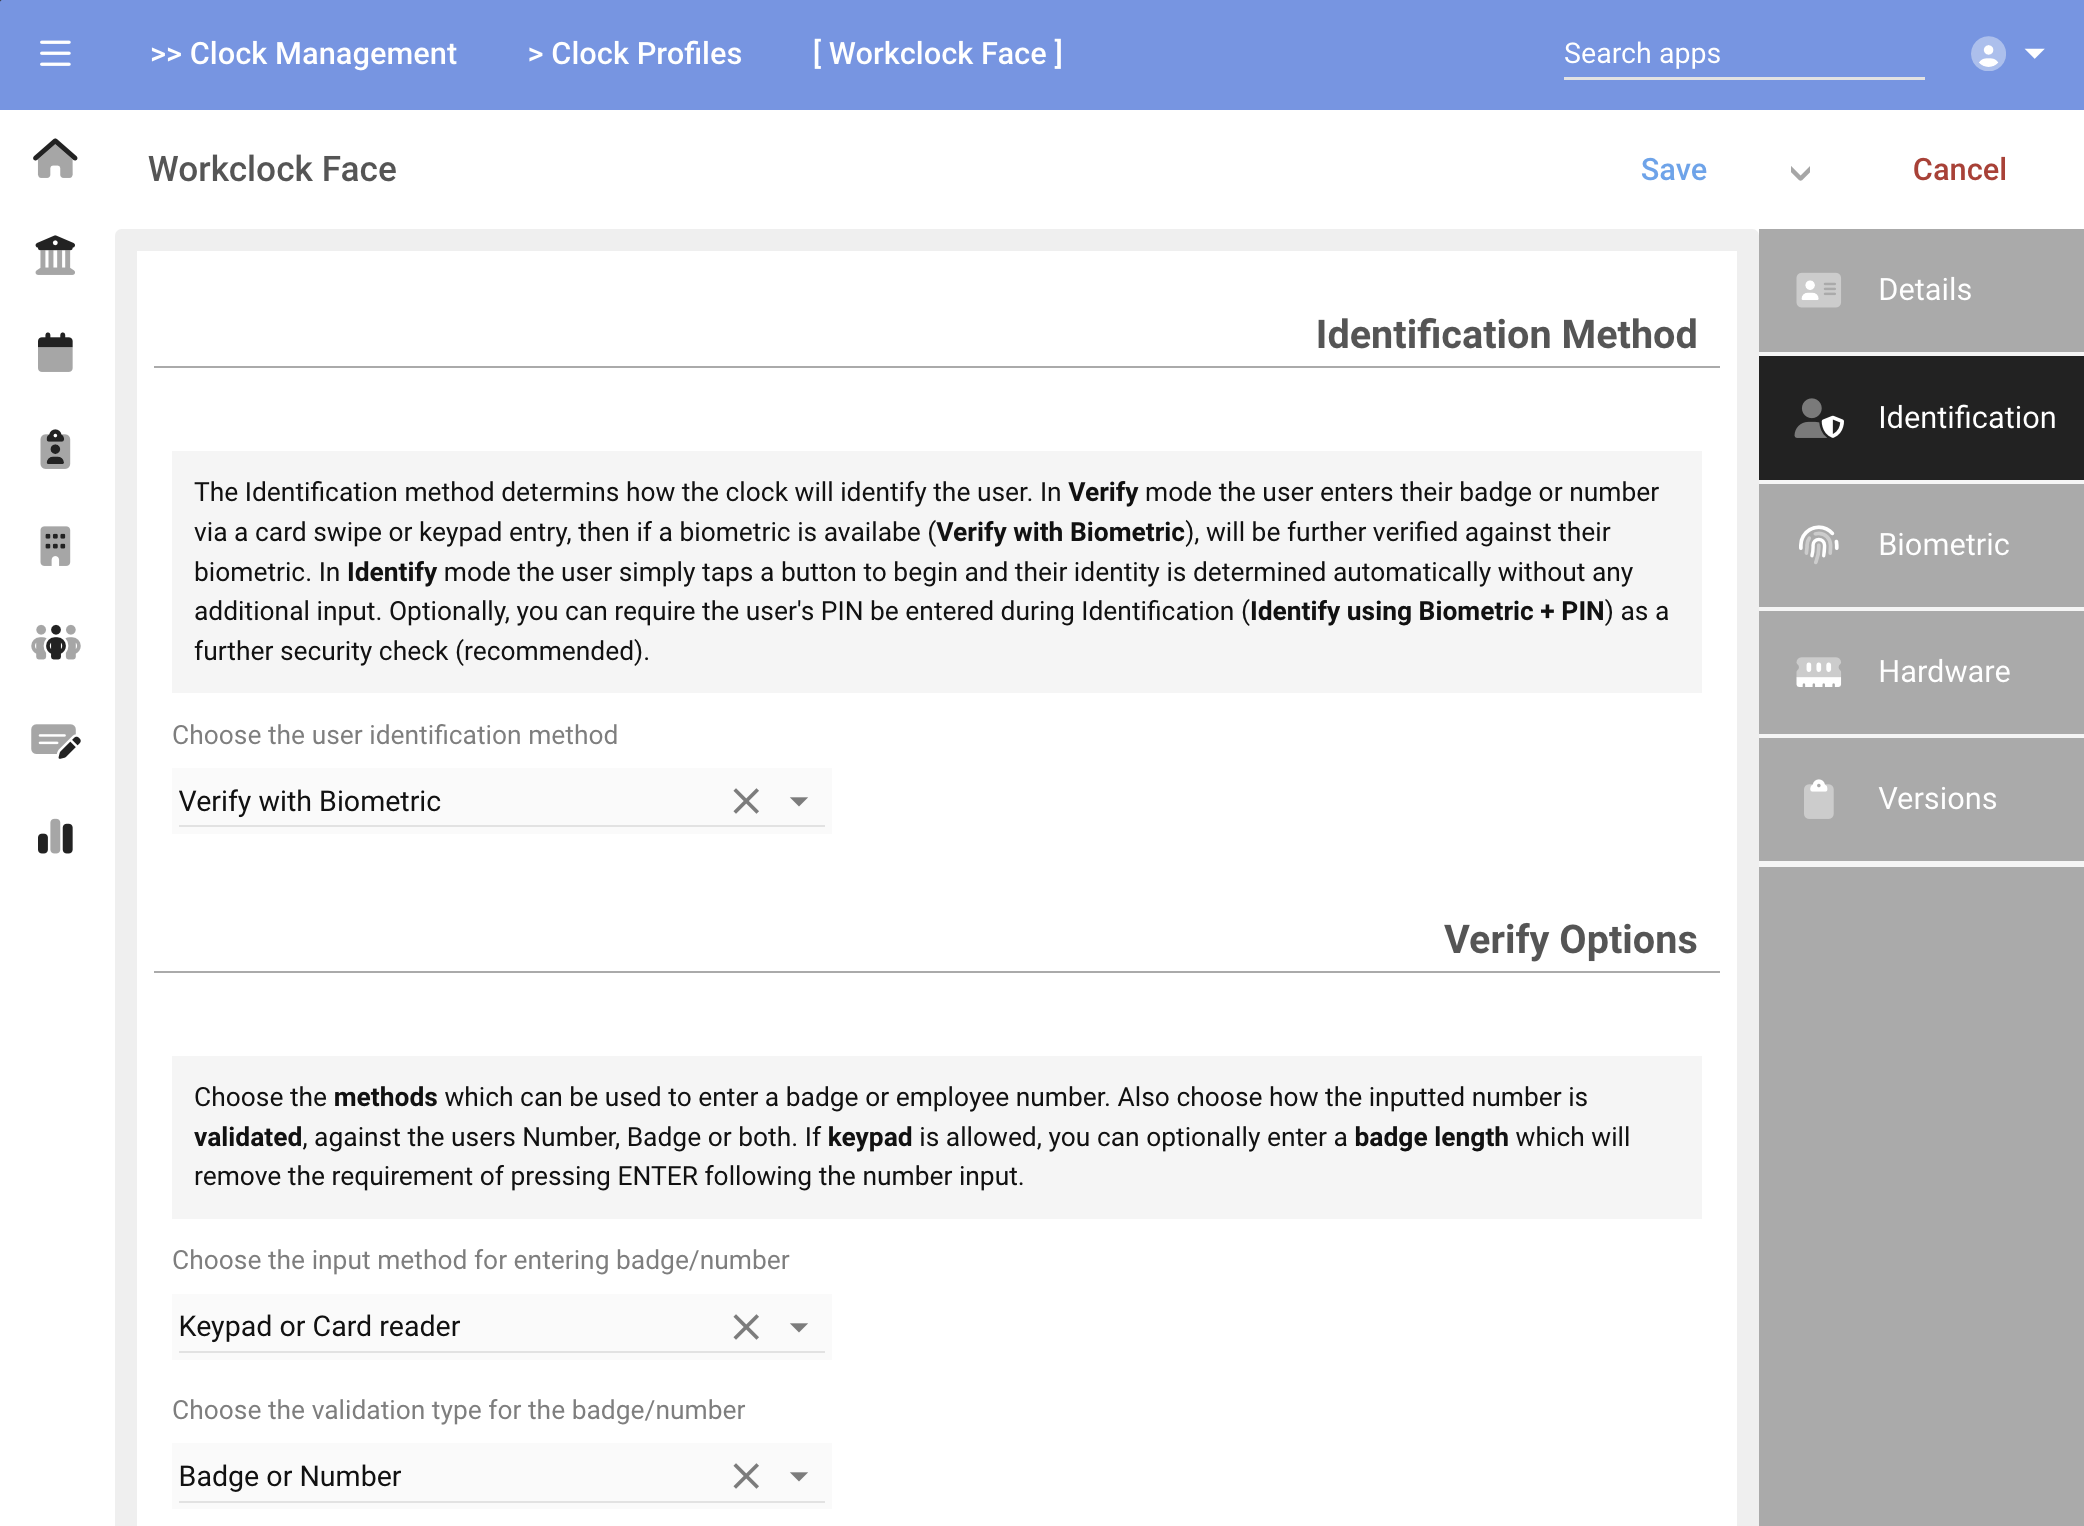
| Identification method | Choose the identification method at the clock device; see table below for additional explanation |
| Input method | Controls how the badge/employee number is entered (keypad, cardreader or either) |
| Validation type | Controls how the above number if reconciled (the employee's Number, BadgeNumber or either) |
| Badge length | An optional length of the above number, such that the ENTER key is automatically pressed when the input reaches this length |
| Enable auto-login | Used on mobile profiles to automatically log a user in after the initial identification. This is a convenience feature to be used only when users are logging in on a personal device; following the first successful identification, the app remembers the user's identity and provides a Login button vs the badge/number entry for quick access to the clock app |
The following table summaries the choices for the above Identification method attribute:
| Identification Method | Description |
|---|---|
| Verify | Use enters their badge or number via keypad or card; no verification is performed other than finding a matching number |
| Verify with biometric | User enters their badge or number via keypad or card, if a biometric is available (e.g. the user has been enrolled) then the biometric is used to confirm the user's identity |
| Identify using biometric | No badge or number is entered; rather the user presses a button to have the clock identify them based on the biometric only |
| Identify using biometric + PIN | Same as the above Identify but the user may be asked to enter their personal PIN to further verify their identity |
Biometric
The following table summarizes the attributes on the Biometric card of a Clock Profile:
| Item | Description |
|---|---|
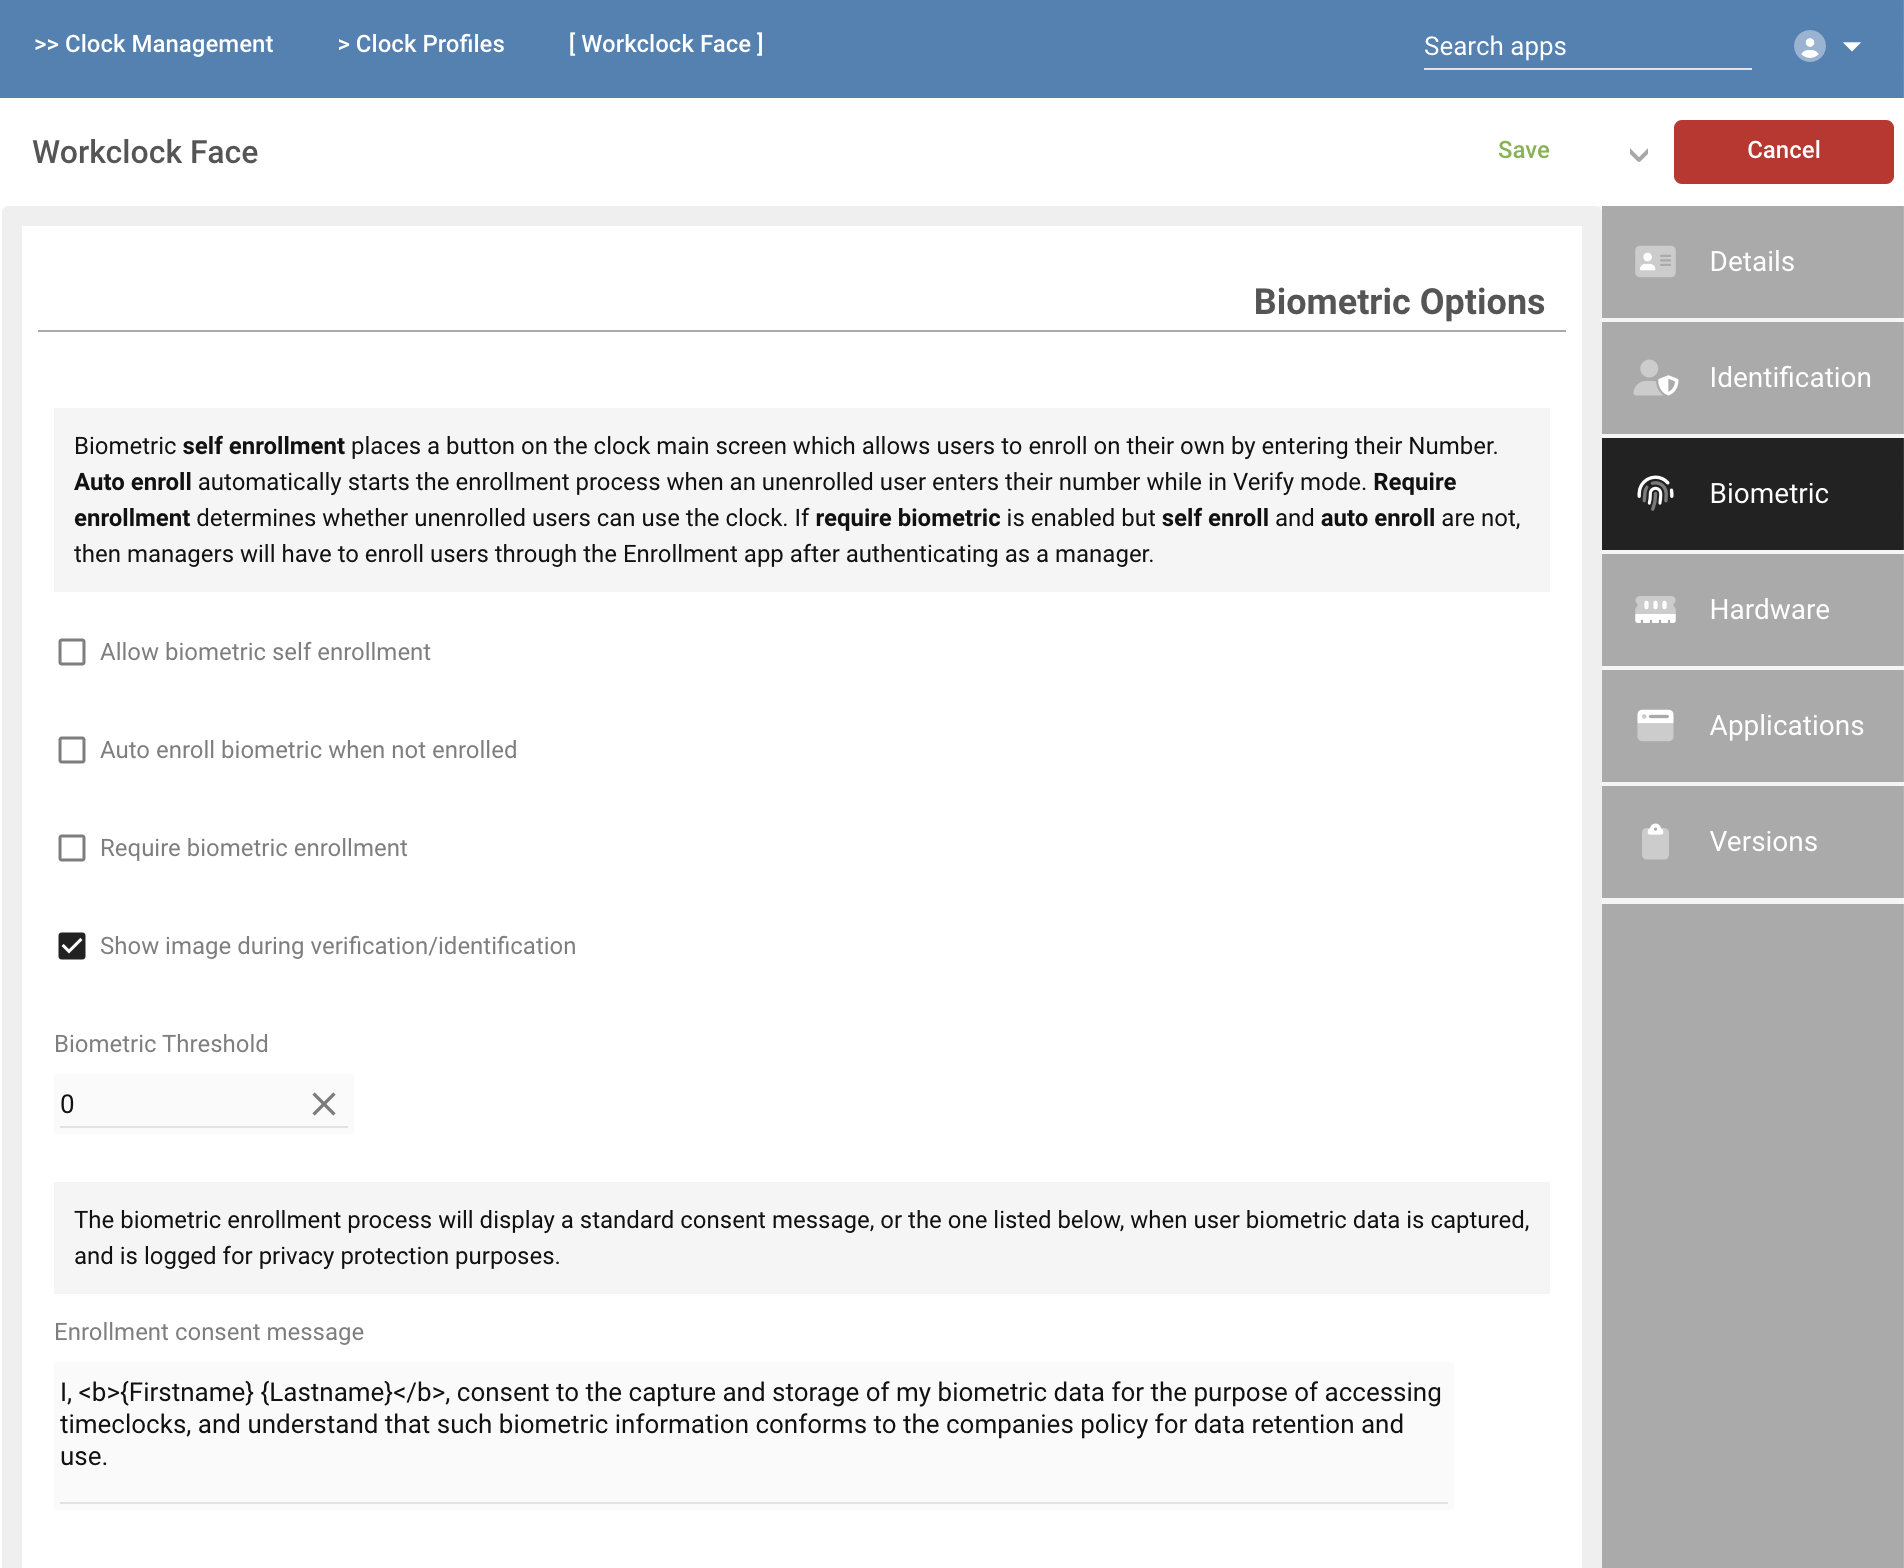
| Allow biometric self-enroll | If enabled, allows users to self-enroll from the clock's main/idle screen. Alternatively (and by default), enrollment is performed by a manager via the Settings/Enrollment app. |
| Auto enroll biometric | If enabled, takes a user through the self-enroll process the first time they verify at the clock |
| Require biometric | If enabled, requires that any user must be enrolled via biometric before being allowed to authenticate on the clock. Alternatively, if not enabled, all users with a valid badge/number can use the clock and will only be verified via biometric once their manager has enrolled them. |
| Biometric Threshold | Allows raising or lowering the minimum threshold for an acceptable biometric enrollment. NOTE: do not change this value without consult from our support team. |
| Enrollment consent | The consent text which is displayed to the user during enrollment. The system records the user's acceptance of biometric capture during the enrollment process by displaying this text and recording an E-Sign style signature. Use {Firstname} and {Lastname} to substitute the user's name, and <b> followed by </b> to bold text. |
Hardware
The following table summarizes the attributes on the Hardware card of a Clock Profile:
| Item | Description |
|---|---|
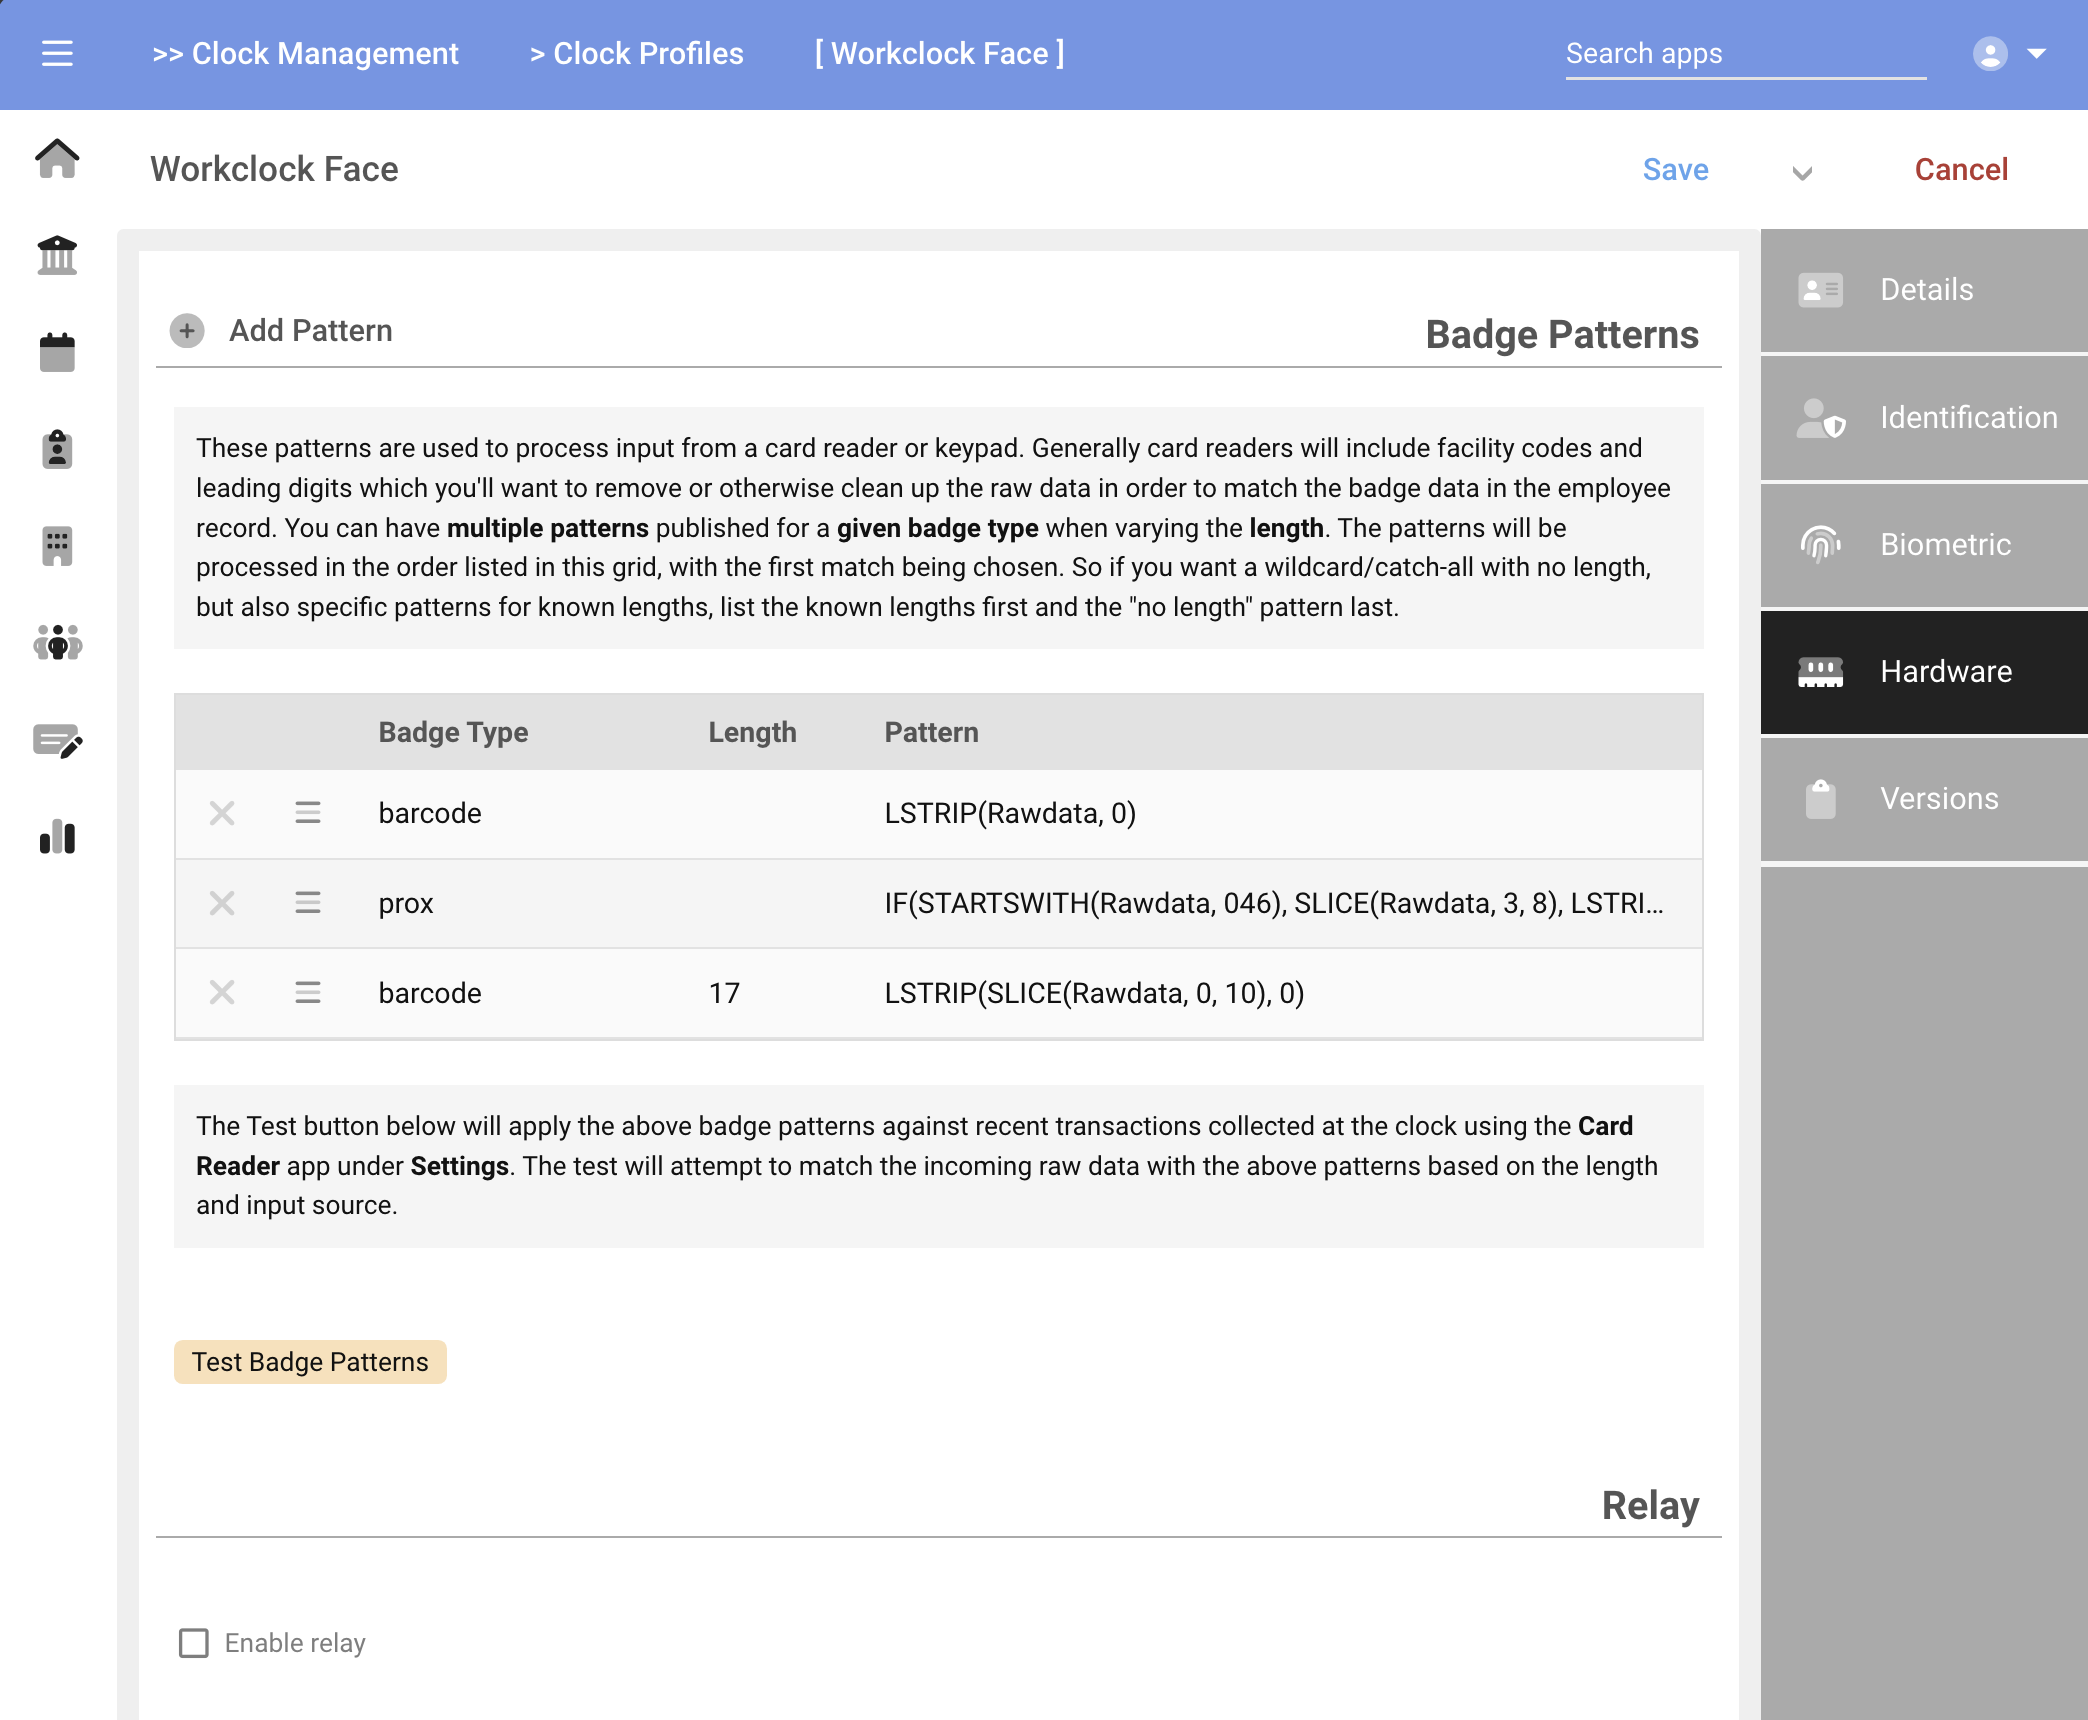
| Badge Patterns | If reading cards, decode patterns may be required to translate the raw card data to the user's assigned badge number. In addition, if different format cards are used on a clock, multiple patterns may be required such that the correct pattern is selected when decoding a card. See Adding a Badge Pattern below for additional details |
| Test Badge Pattern | Provides a real-time testing tool for confirming if badges are being decoded correctly. See Testing Badge Patterns below fore more details |
| Enable relay | Set to enable firing an optional relay upon identification of a user, such as to open a door. NOTE: requires compatible clock hardware and an optional relay module |
Adding a Badge Pattern
Badge patterns are used to convert raw card read data into the number assigned to a user. Generally, cards will have facility codes and other leading or trailing digits, and the data read by the clock will be more than the number assigned to the user. Initially, try reading cards without a pattern to observe the output (see Testing Badge Patterns below), then create a pattern to pull out the required badge number if needed.
Press the Add Pattern button on the top of the Badge Patterns list to create a new pattern
When a card is read at the clock, a best-fit pattern is located from all available patterns based on the information provided in the pattern setup within the profile. The following attributes are compared:
| Item | Description |
|---|---|
| Badge type | If a Badge Type is selected in the pattern setup, the clock will only consider patterns that match the underlying hardware reader type (which is known to the clock). In this case, a Prox pattern will not be used when the clock knows the data was read from a barcode reader. However, if the Badge Type is left blank, then the pattern will be considered for any card or keypad input |
| Length | If an optional length is provided, the length of the raw data is used to find the best fit; only patterns with a matching length (or no length) will be considered |
| order | Lastly, the order in the list is used to qualify a pattern; higher matching patterns will be chosen first |
Only one pattern will be selected for any card or keypad input, even if more than one pattern may match the criteria
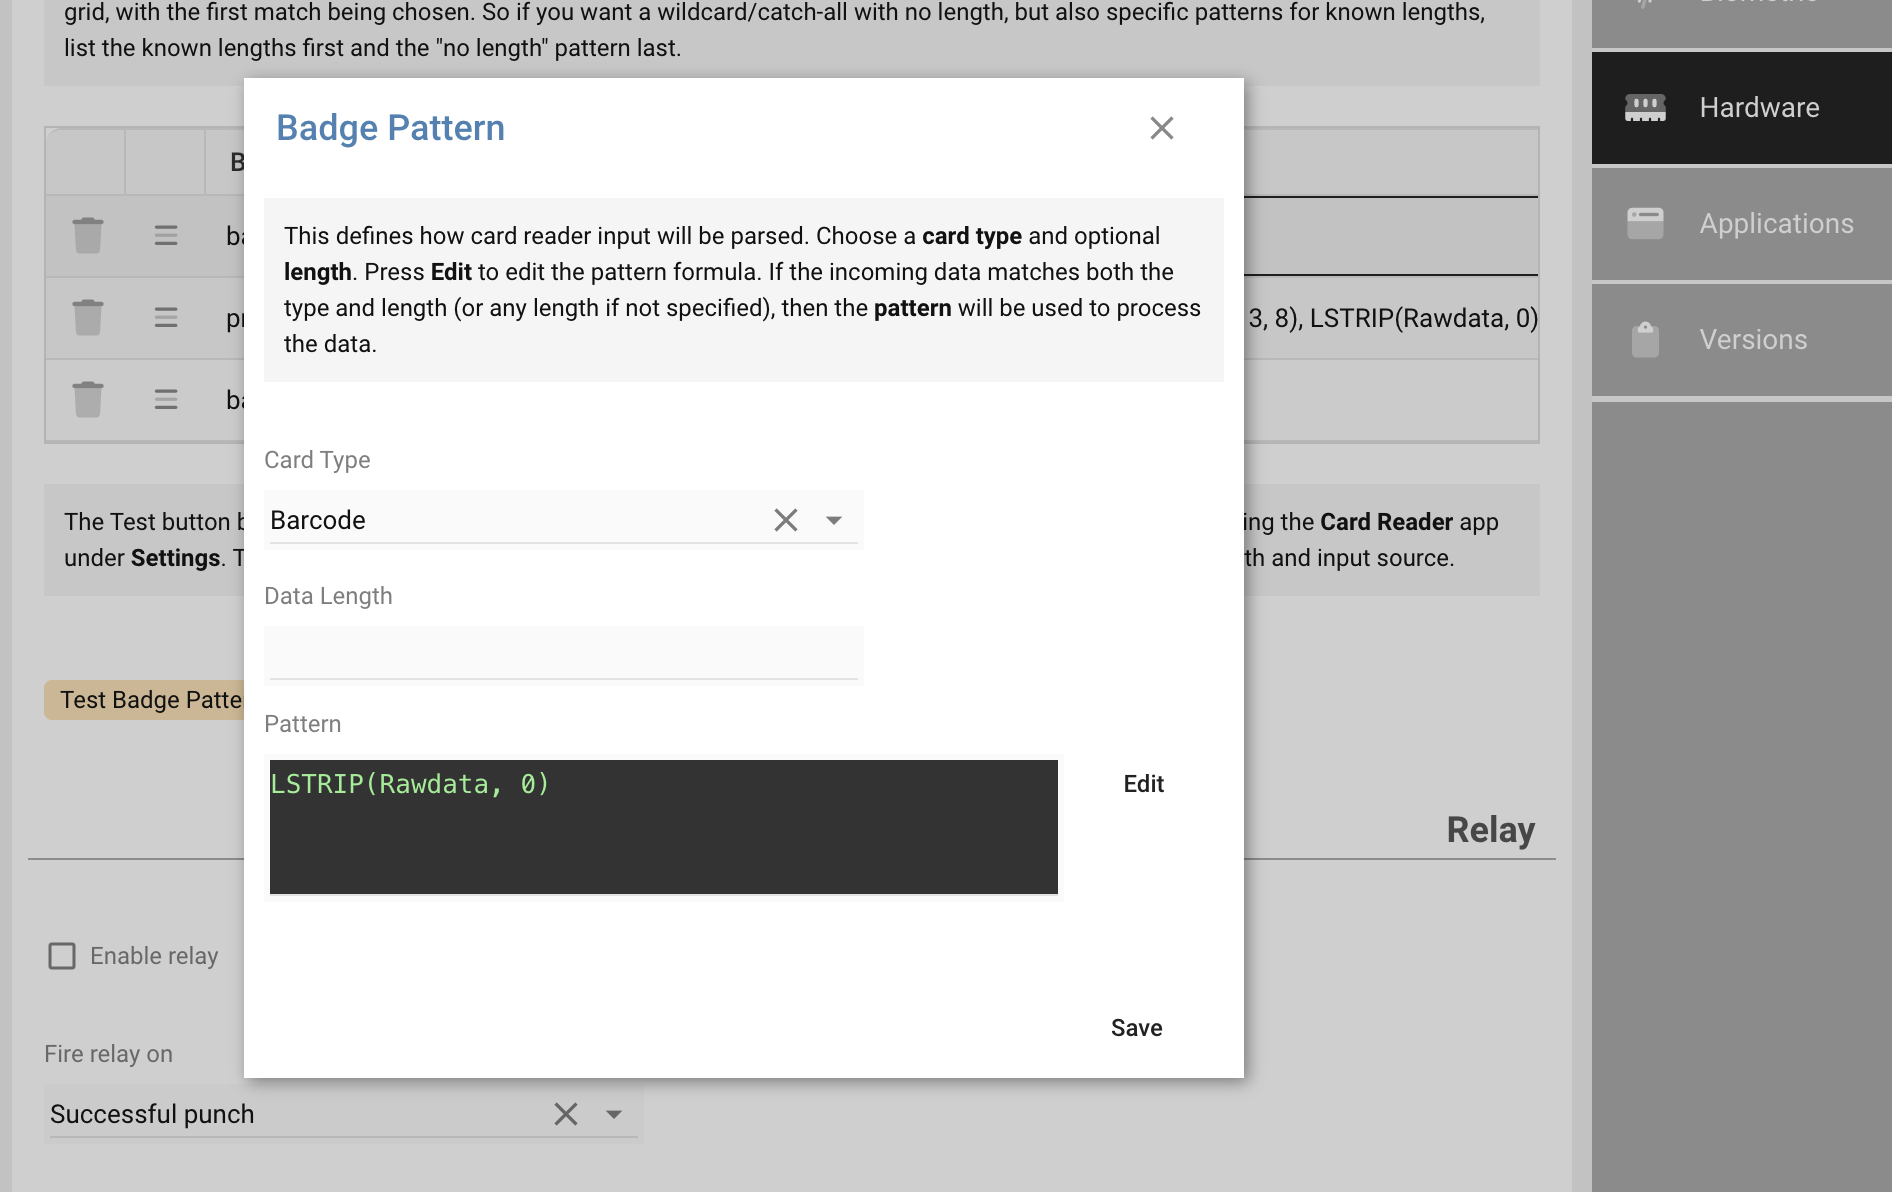
Pattern Scripts
The pattern script is written using the platform's Rule Editor and therefore has access to the full Functions List. Most patterns are string manipulation such as trimming leading and trailing characters, or slicing a section out of the raw data read.
The image below demonstrates a SLICE to extract the first 10 characters of the data, followed by a LSTRIP to remove leading zeros.

Testing Badge Patterns
After creating a pattern, a user can perform a card read test at the clock in order to test the output of the pattern.
The user may need the Security Pin in order to get into the Settings menu at the clock.
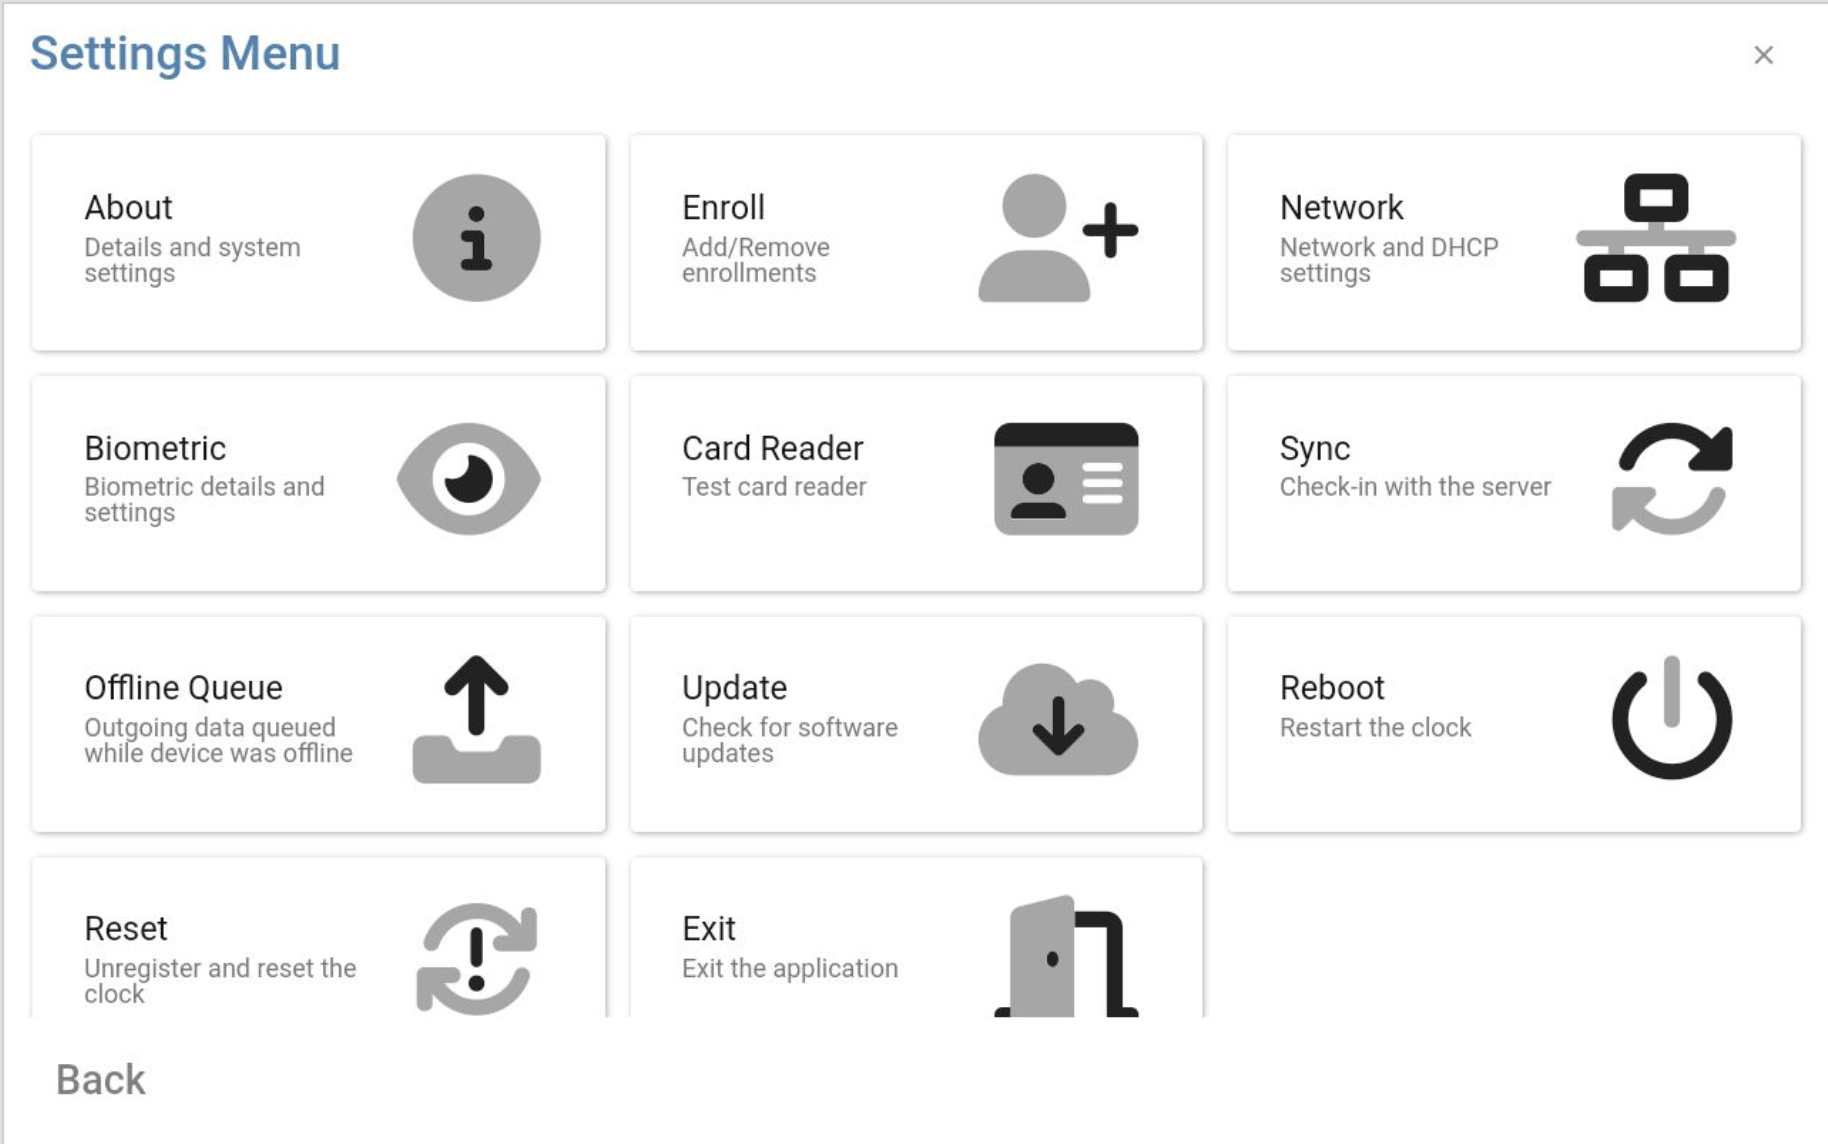
Next choose the Card Reader app within the settings menu. Press the Read Card button to start a card read test; then place the card in position to be read.
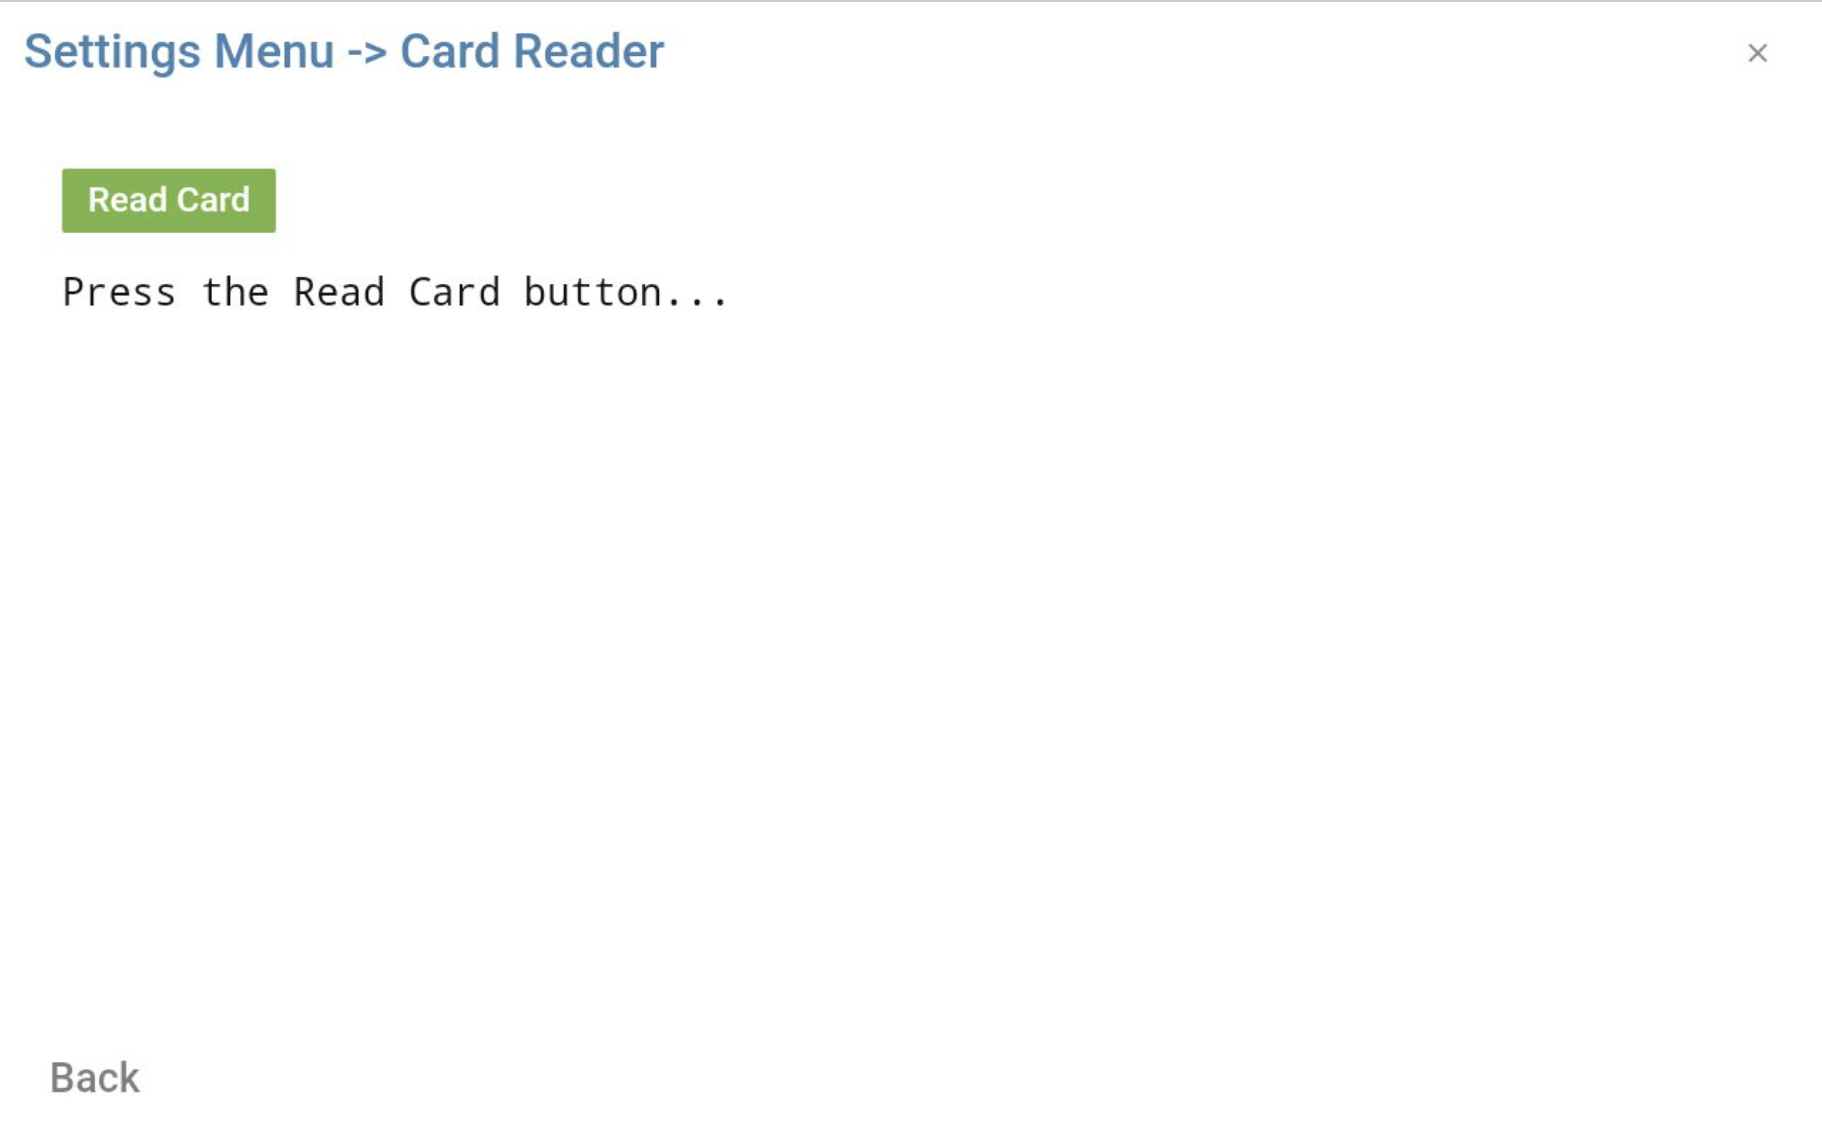
For Prox type cards, place the card near the icon on the lower right side if the clock; for barcode, hold the card below the clock in the visible light stream
Back in the Clock Profile for the test clock, press the Test Badge Patterns button on the Hardware card of the profile to display the test results. The Card Reader Transactions screen displays the most recent transactions received from the Card Reader test app on the clock. Each line displays the following:
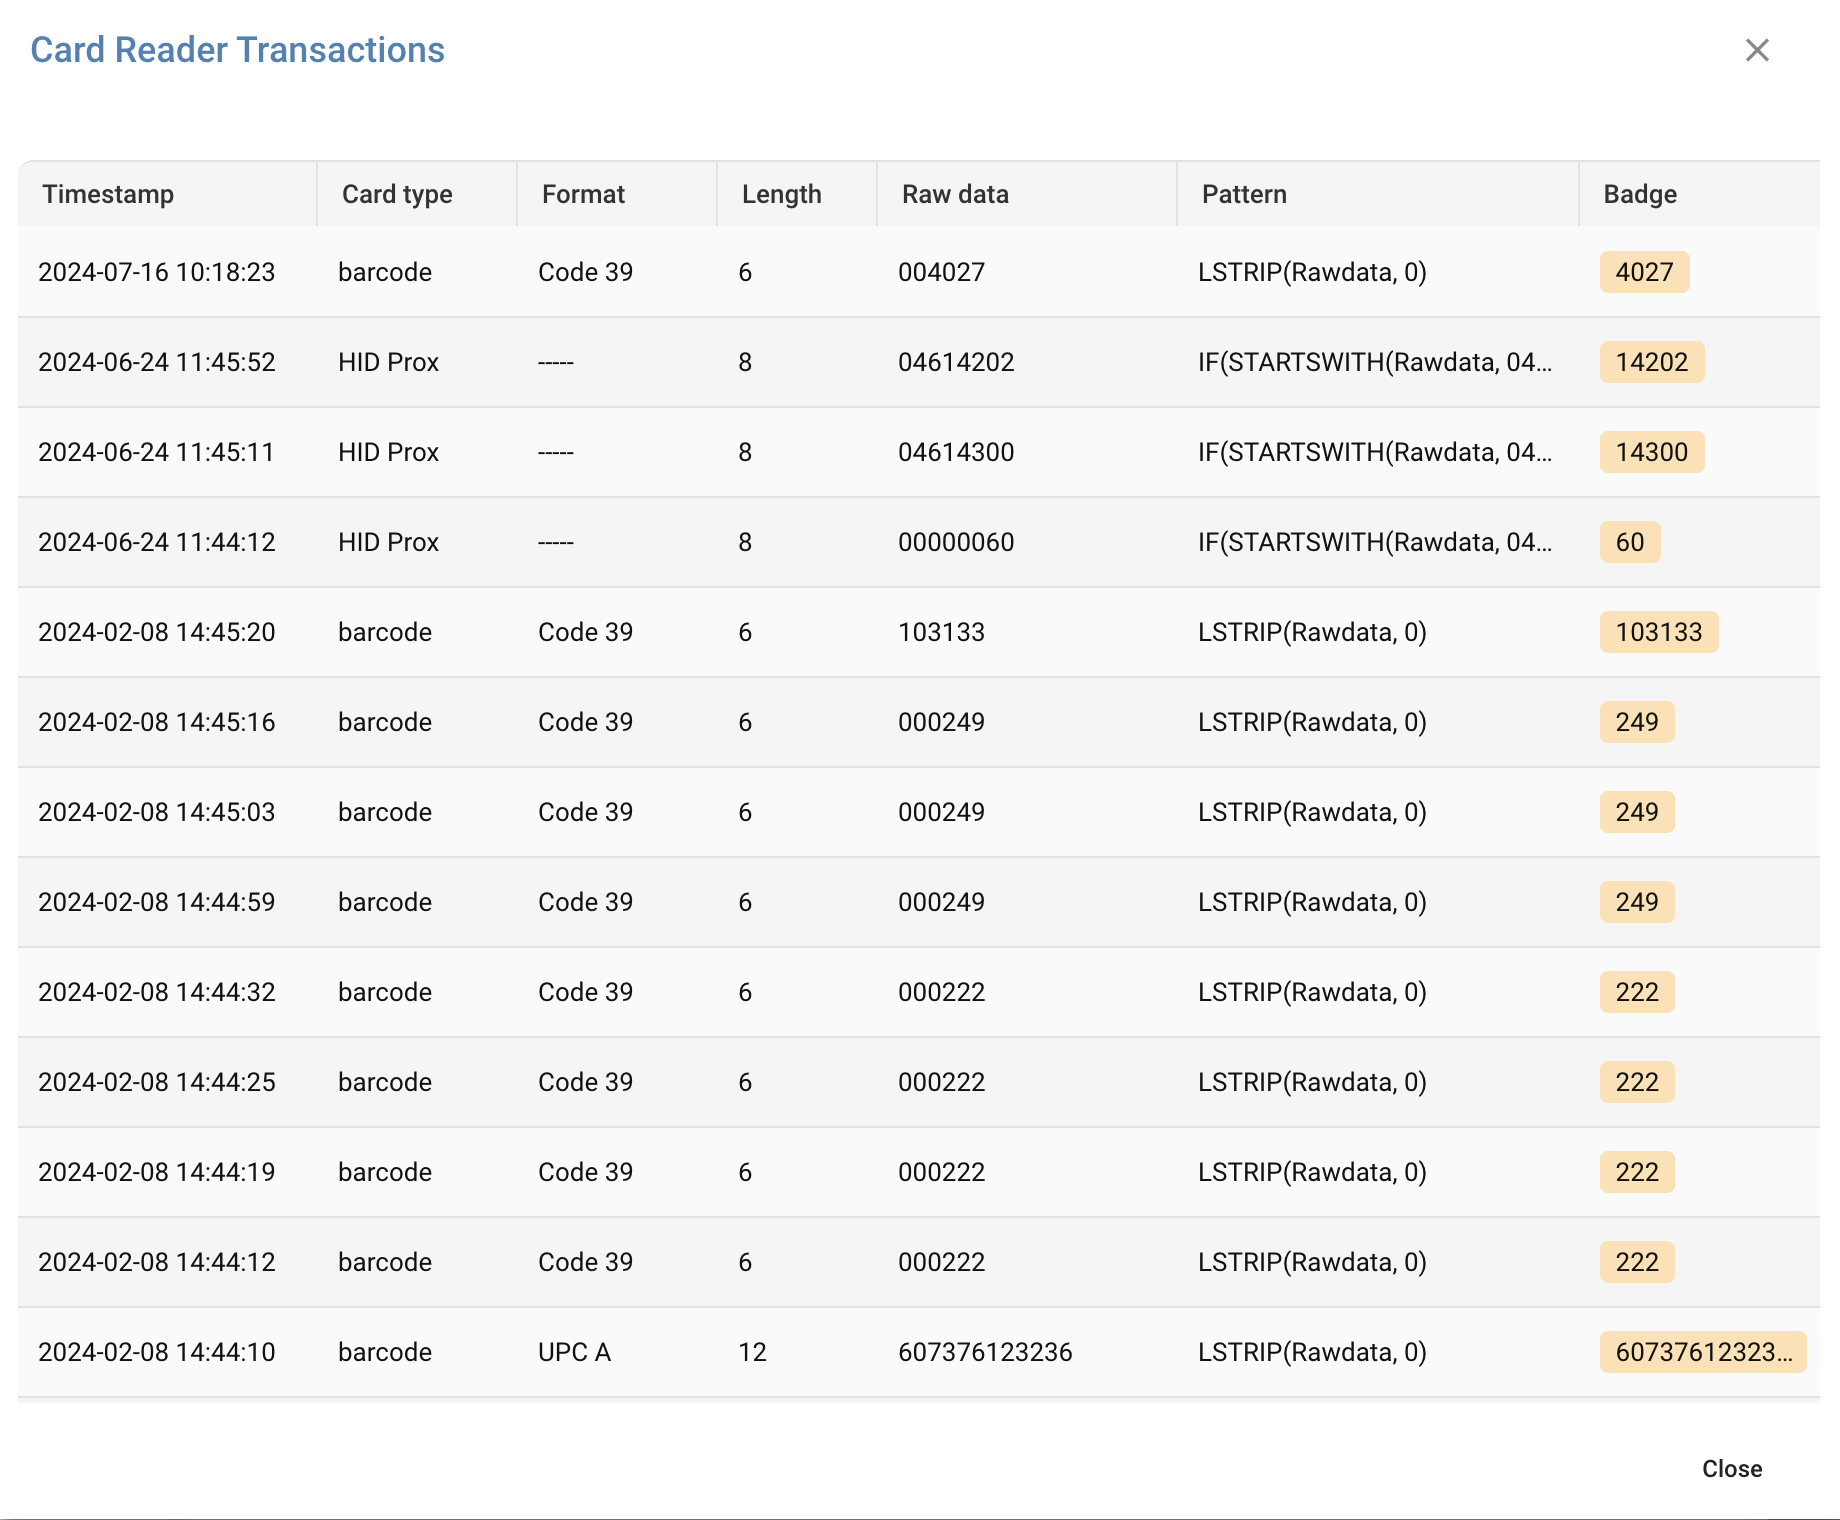
| Item | Description |
|---|---|
| Card type | The type of card detected by the clock |
| Format | If available in the card encoding, the underlying format of the card data |
| Length | The length of the raw card read data |
| Raw data | The raw card read data |
| Pattern | The best-fit pattern chosen by the system for the given card read |
| Badge | The resultant badge after running the raw data through the selected pattern's script: this is what will be used to locate a valid user's badge number |
You may need to modify the Badge Patterns for the current profile to get the correct final badge number, or to insure the correct patten is being chosen.
Applications
The Applications card of the profile controls which apps are allowed on the clock or device. Generally, this is intended to be a subset of the applications a user may have available to them via their User Profile as it may not make sense to allow certain apps while at the clock, vs when using a mobile device or PC.
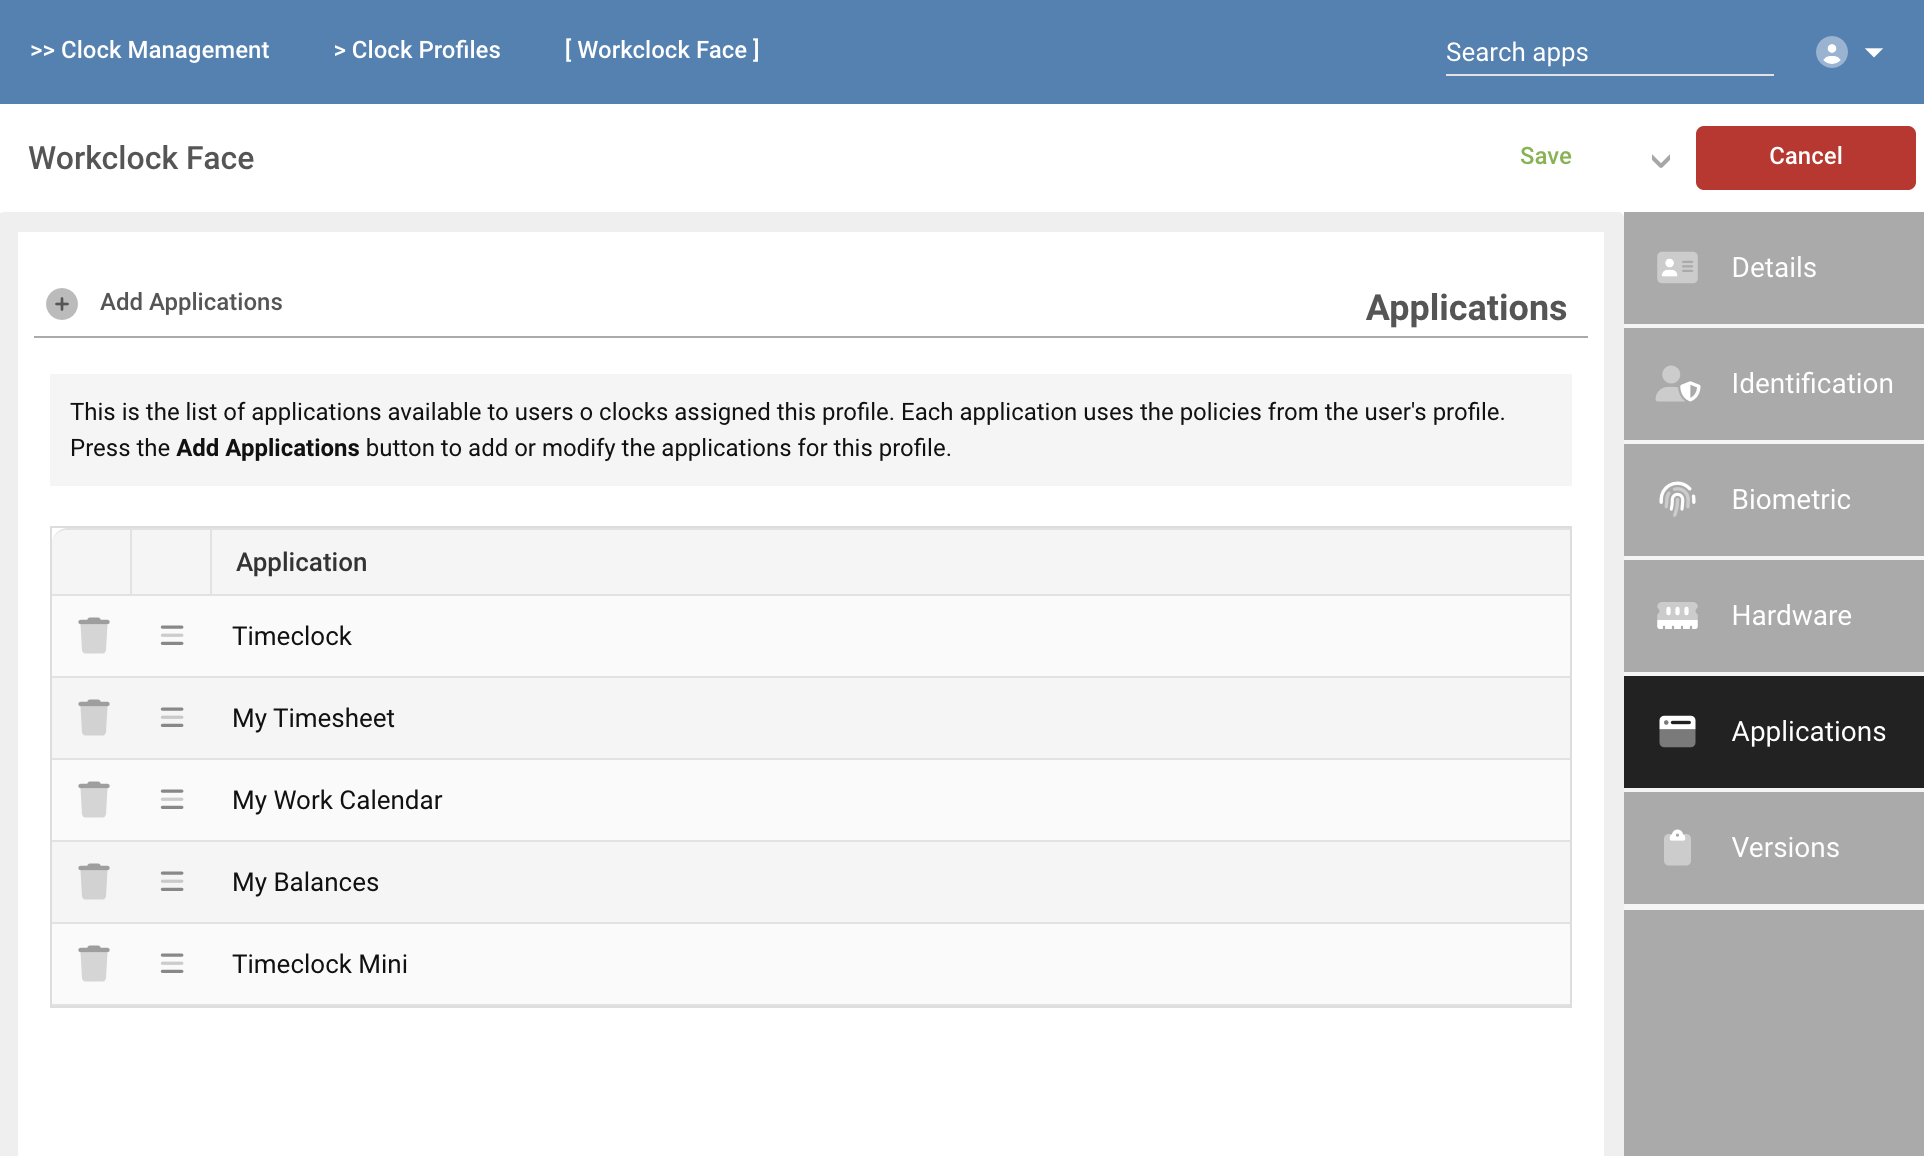
Use the Add Applications button at the top of the application list to add or remove applications from the profile
In the Add/Remove Applications dialog, choose the applications which you wish to deploy to clocks or devices using this profile. Use the Search box to find applications on the list, then check the box to include (or uncheck the box to remove).
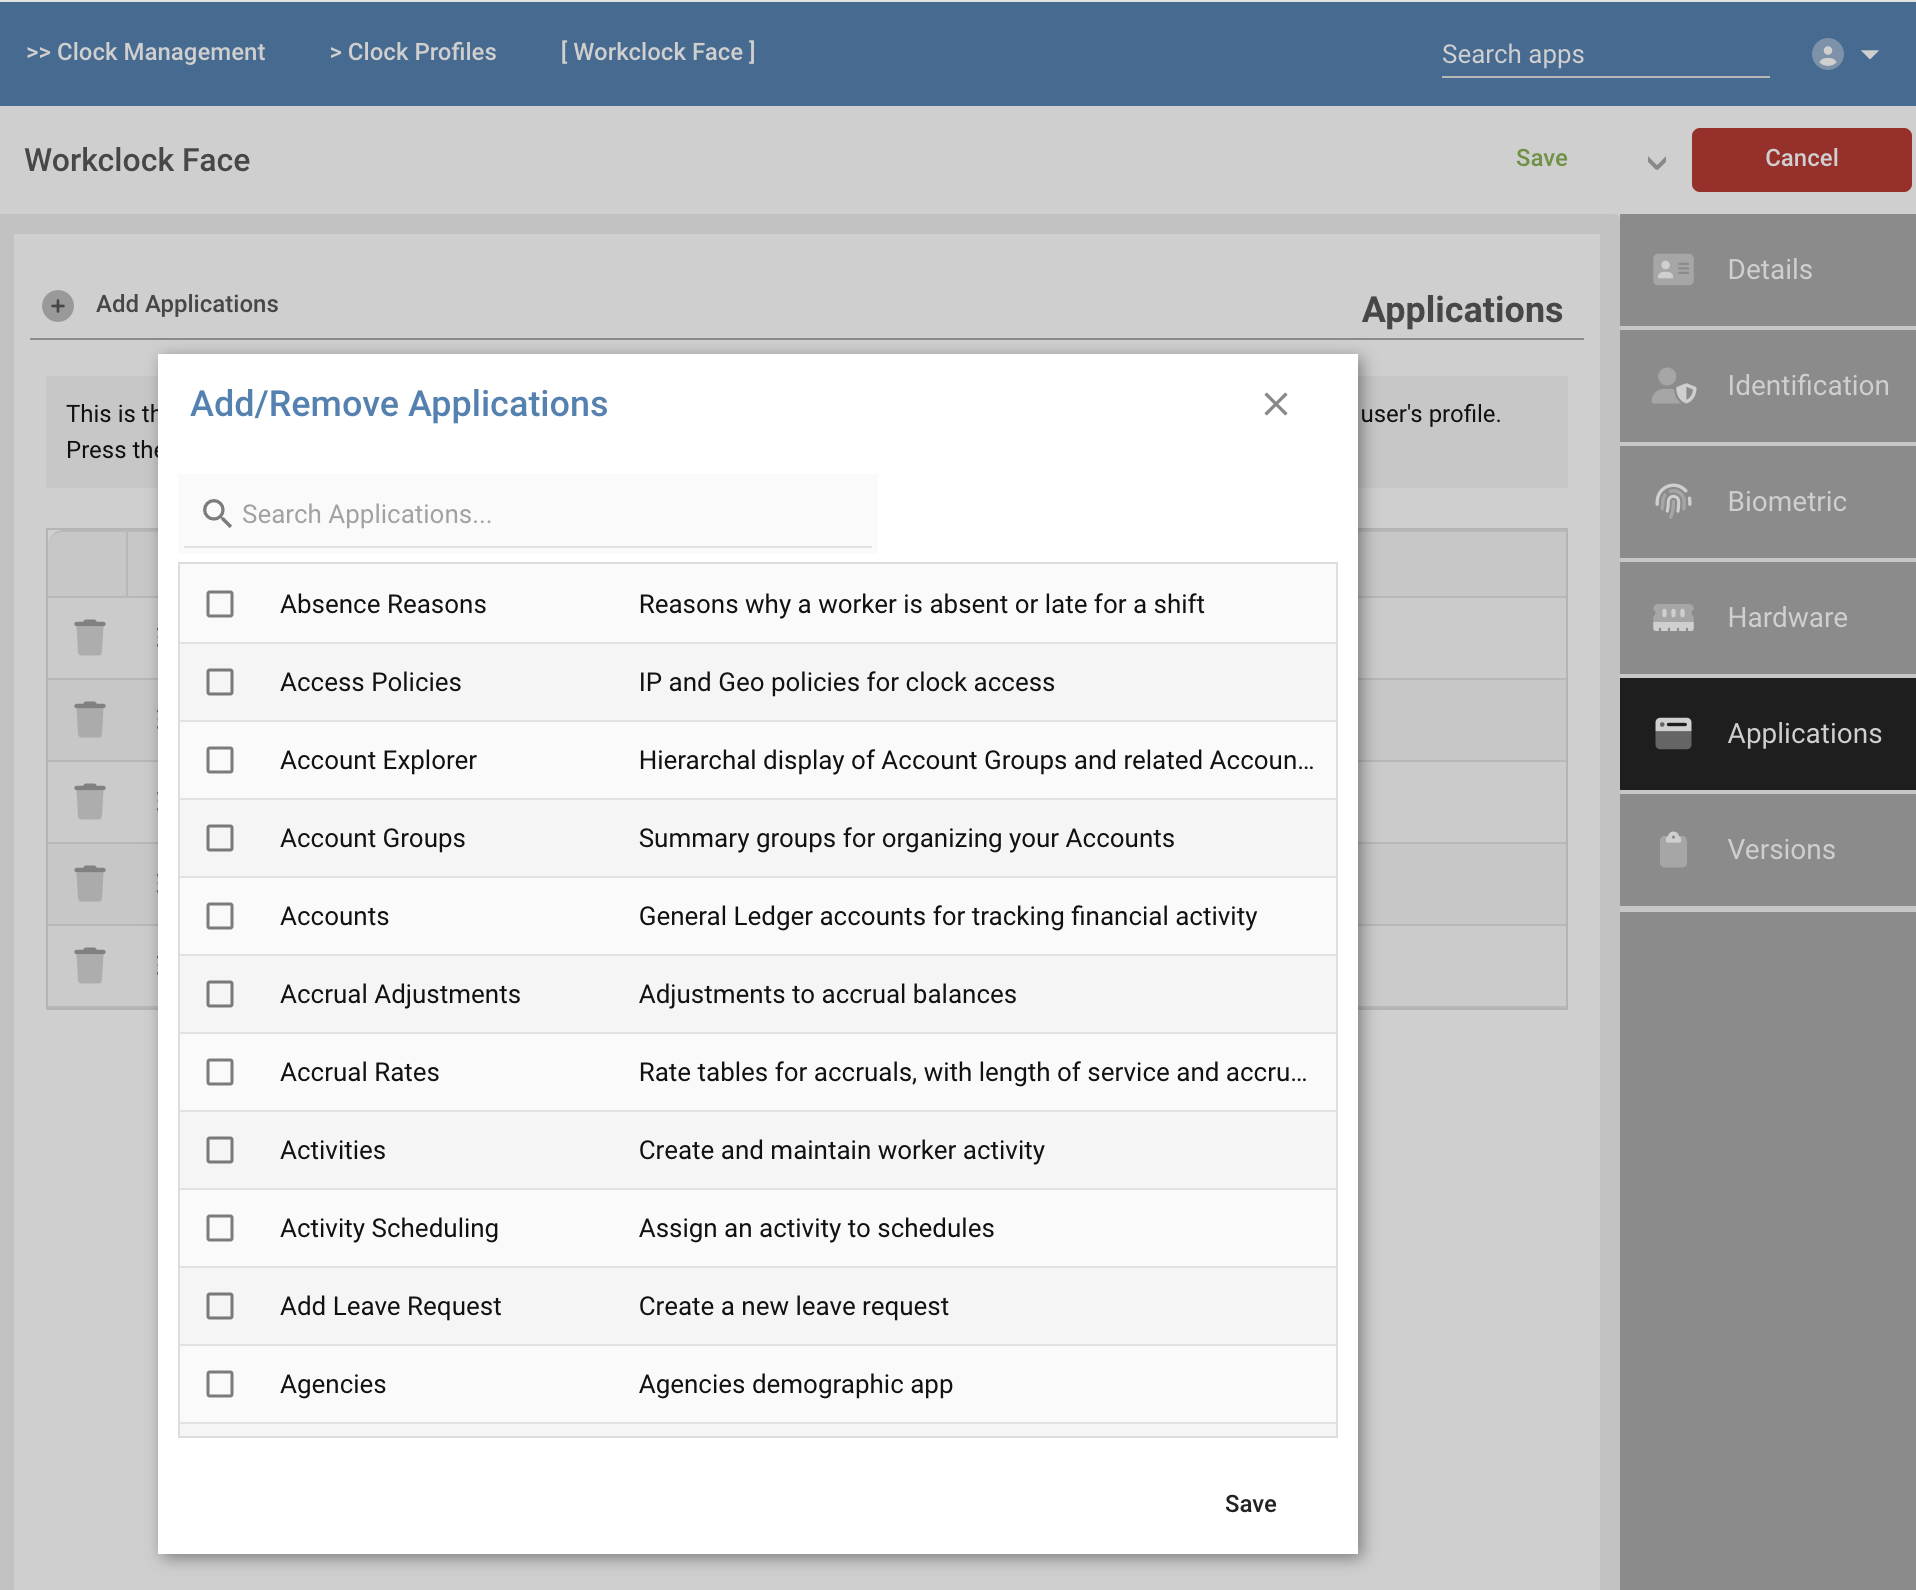
If applications are chosen in the profile which do not exist in the user's profile, the application will not appear on the clock or device.
Default Application
The application that is displayed by default when a user authenticates at the clock or device is managed by the User Profile assigned to the user. A different application can be chosen based on whether the user is on a clock, mobile or PC. See User Profiles for additional details.